wood market trays + blackboard paint = chalkboard sign decor

Monday 30 July 2012

Chalkboard signs are showing up at weddings, parties and food bars and I today I'm going to share with you how you can turn our wood market trays into chalkboard signs.
Our disposable wood market serving trays are available in different sizes and shapes. The shallow trays make great chalkboard signs. I can see painting the deeper trays so that you can write on the outside and use the tray to hold favors, etc.
 I often use the long rectangular market tray to serve cake pops and mini cupcakes. The trays are disposable but if they are not greasy I find that they can be cleaned up I can easily restyle them as chalkboard signs.
Go Green: Use the market trays to serve goodies at a bridal shower and restyle them as chalkboards at the wedding!
I used Martha Stewart's blackboard paint which is available in the Creative Studio space in the Toronto store. I applied a couple of coats of the blackboard paint with a foam brush to the front and back of each market tray.
If you want to be able to reuse these chalkboards, you should write on them with chalk. Follow the directions on the chalkboard paint for drying instructions before you start writing!
If you want a permanent sign (so that little fingers cannot smuggle your design) use white china markers instead of chalk. White china markers (which look like pencils not pens) are usually available in any office supply or craft store.

Lorrie's Secret To Creating Perfect Type:

1. I create my type/design on my computer and print it to size. If you are making a sign larger than letter size, you may have to print your design on letter size paper in sections and tape them all together to create your final size.
2. Use painters tape to hold your paper in place on the tray once you have it positioned properly.
3. Then use white carbon paper and a pencil to trace your design onto the chalkboard surface. You can move the white carbon paper around under the paper if the carbon paper is not as large as your final design.
4. Once the entire design has been traced, remove your paper(s) and the carbon paper and you should see an outline of your design. Using either chalk or a white china marker, you can now redraw your design. 
It's that easy and everyone will think that you are a professional sign maker!

And if you are looking for some chalkboard inspiration for your wedding, party or special event ... here are some that I have pinned on my various Pinterest boards ...
my Pinterest inspiration sources:

happy {birth}day banner and a free download

Tuesday 24 July 2012

Don't you just wish that everyday could be a "happy day"?!

I created this banner a while ago to at one of the Creative Evening Events. It is currently hanging in the Creative Studio at the Toronto store and I have had a number or people ask me how I got the letters on the banner. 

I was able to add the letters to the canvas banners* using our iron on transfers.  I printed the iron on transfers on my home printer. I showed you how to use the iron on transfers here and here.

You can create the lettering on your computer using any font you would like - just size the font to fit the size of your banner. I am going to give you the letters that I created to spell "happy birthday" as a free download ...
You can download the art as you see it above from here if you want to reverse the art yourself before printing ...

or you can download the art already reversed here so that you just have to do is print as is on an iron on transfer sheet.


I was able to make the letters more three dimensional using a product called Glossy Accents which is made by Inkssentials*.

In the picture above on the left you can see that I applied the Glossy Accents product directly on top of the letter. It is quite thick, easy to appy and takes a l-o-n-g time to dry. Tip: Do not shake the bottle before or during use .. you don't want any air bubbles! If you want a shiney three dimensional letter that is all you have to do. If you want to add a little sparkle to your letter you can add glitter to the Glossy Accents before it dries. Tip: I pour my glitter into salt shakers to make adding the glitter easier.

To add some colour to my banner I added three different ribbons. I used a great two-sided fabric tape* to adhere the ribbons to the top of the banners.

* Note: All of these products are available in the Creative Studio at the Toronto store.


creative wrapping inspiration

Tuesday 17 July 2012

During my last workshop I demonstrated a number or different tools that we have in the Creative Studio in our Toronto store. These tools not only make your diy packaging projects look professional they can also save you time.

I have talked about the sew ribbon tool and the paper punches in previous posts and I wanted to inspire you with a few more projects that I have created using these two tools.

Let's start with the Sew Ribbon tool ...

I showed you in my last post that you can use this handy little tool to embellish stationery projects ... but did you know that you can also use this tool to add ribbon to favors?!

Our paper bags go from ordinary to extraordinary with the addition of a ribbon. I also used the paper edge paper punch on the top of the bags for a more feminine look. Can't you see these as a favor bag for a birthday or a wedding?  

I can easily see vendors at the One of A Kind Craft Show in Toronto using these paper bags to package their handmade products. They could pre-punch the bags with the sew ribbon tool and add the ribbon once the product is added to the bag. The type and colour of ribbon would match the artist's branding. Not only is this a beautiful and inexpensive way to package product ... it is also instant gift wrapping (talk about customer service)!

Now here are some more ways to use the paper edge punches ...
I have already told you that you can use paper edge punches on paper bags. I used simple kraft bags on all of my samples but they would work on so many of our paper bags. We have some new paper punches in the Creative Studio now and I can't wait to try this out on the notions bags!

I used the paper edge punch on white card stock to decorate the two kraft boxes pictured above.

You may recognize the mini tissue paper flower pompom from one of my earlier posts. I made the one you see on the box using three sheets of 7.5" x 10" tissue paper and using the same instructions that I gave you in this tutorial.

The other box with the long paper "ribbon" detail would make a great favor and place card in one. Just write the guests names on the blank space in the middle of the paper ribbon! If you like the paper flower on this package I showed you how to make these a while ago and you can find the tutorials here and here.

Happy {creative} packaging!


{diy} stationery inspiration using our stationery kits

Saturday 14 July 2012

Are you planning to make your own wedding or party stationery? If you are ... we have lots of diy stationery kits in our stores and online.
We stock these items in the wedding section but I want to show you that the papers in these kits can be used for more than just wedding invitations. It is very easy to customize these papers using your printer, some embellishments and your imagination.
Here's how I created the samples shown above using my home computer & printer:
 ADDING YOUR TEXT 
On my computer, I prepare all of my type in a document that is sized to fit the stationery paper I will be printing on. I work in Photoshop and Illustrator but you can do this in the software of your choice.
Tip: To make sure that all of your type is set to fit within the blank space of the invitation, set your margins and leave 1/2" of white space between the stationery design and your text.
Once I am happy with my text, I save the art and open a new 8.5" x 11" document. I paste my saved art to the new document and position the art so that it will fit in the top left corner. I do that so that I can easily line up the invitation papers.
PRINTING
1. Test print your letter size document on regular bond paper. Tip: do not allow your computer to resize or centre your image. You need to print as is (size and position).
2. Then I use a light source to make sure that I am happy with the invitation set up and positioning of the text. You should be able to see through the papers and get a good idea of final placement ... see #2 above. If you don't like what you see ... go back to the computer and modify your text. If you are good to go, add a few small pieces of masking tape (or painter's tape) to the edge of the stationery to hold it in place against the bond paper for printing.
3. Manually feed the combined papers through your printer. Carefully remove the tape from the invitation so that you do not tear the paper and admire your work!! You can continue to print more invitations using the same bond paper.
Keep in mind that the font(s) that you use and the colour of the font(s) will set the tone for your event. We have stationery designs that are very elaborate like the letterpress sample shown above in pink and brown but we also carry designs that are less ornate and can be customized to fit many different themes.

You can customize your stationery using embellishments. Our new resin flowers are perfect for wedding stationery. They are available in three different sizes and lot of colours. In the sample above I knew that I would be adding the resin to the top of the stationery so I positioned the text with that in mind.

Tip: I used Inkssentials Glossy Accents (available in the Toronto store's Creative Studio space) to adhere the resin flowers to the paper and know that it works well. I would suggest that you test whatever glue you want to use to make sure that the resin bonds smoothly to the paper before you do too many invitations.


So here is the same stationery kit paper but this time I used it to create menus. Who said that stationery kits had to be used for just invitations? And because this would not be sent in the mail, I used one of our large resin flowers to decorate this piece.

Everyone knows that the smaller cards in the stationery kit can be used as reply cards ... but that is not the only thing that they can be used for! How about creating your own "save the dates" as I did!! A small resin flower was added to this sample.


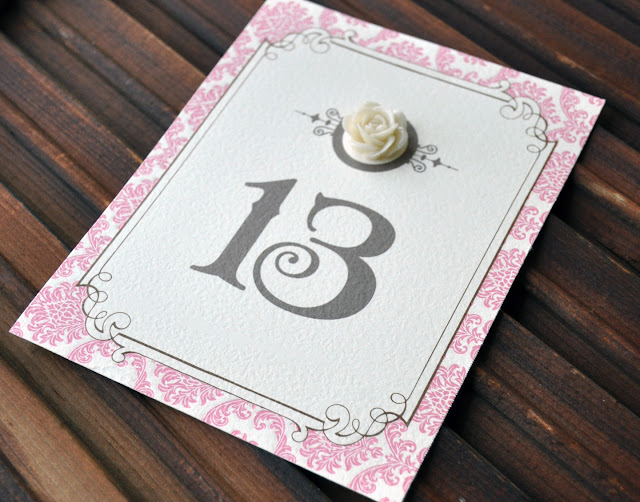
To create table numbers, I would use either the large or the small (as seen above) stationery. In my sample above, I designed the art so that a small resin flower could be positioned on top ... which is a good idea if you have someone helping you to assemble a lot of these because they will know exactly where to place the embellishment. 


The sample above was created for a birthday party. It was embellished using a resin flower and satin ribbon. I was able to add the ribbon by using a tool called Sew Ribbon. I will share other projects using this handy tool in my next post. You can view a tutorial for using this tool from We R Memory Keepers here ...

We sell the Sew Ribbon Tool in the Creative Studio at the Toronto store.


We have lots of simple "thank you" cards that can be embellished with ribbons, resin flowers and rhinestone buckles.


Here's one last project that I wanted to share with you. This time I created a little home decor item using the letterpress stationery. I knew that I wanted to add a resin flower to this piece, so after printing the quote, I used two sided tape to adhere the paper to the glass of a picture frame.

Wedding favor inspiration from a customer!

Thursday 12 July 2012

These beautiful wedding cookie favors were created and packaged by one of our customers. 

I stumbled upon the picture of these favors on Pinterest last week and as soon as I saw the favors I knew that the scallop circle cookie boxes were ours. I quickly pinned the picture to my wedding favors board and then went on a search to find out more about the favors.

When I followed the Pin to the source I found Jacquee and her blog! Jacquee made these fabulous cookies for her sister's wedding. I was so excited when I read that Jacquee is one of our customers and that she did indeed package her handmade cookies using our white cookie boxes and silver ribbon.

I enjoyed reading Jacquee's blog entry regarding the making of these wedding favors. It was quite the adventure with a very happy ending. Jacquee creates sweets as a hobby. If you look at all of the amazing sweets that she has created and posted on her blog, I am sure that you will think as I did, that Jacquee does this full time as a business. I asked if she would consider doing custom orders for weddings, birthdays and other special events and she said that if the timing was right she would! You can reach Jacquee via her blog at I Sugar Coat It!


add a little glitter!

Tuesday 10 July 2012

I have seen glitter on everything lately from eye makeup to shoes and accessories to home decor.

If you are looking to add a little (or a lot) of glitter to your wedding, party or other special project ... we have a number of new "glitter" products that have arrived into the Toronto store in the past couple of weeks.

In my previous post, I told you about the new Wendy Addison glitter products (pictured above, top left) that are merchandised in the Creative Studio.

We now have beautiful lace with glitter that is sold by the roll in white and ivory (top right). You'll find it with our regular and sparkle tulle. I know that a number of customers have been looking for rolls of lace lately for their wedding and I think that this would be beautiful on our glass containers with candles or flowers, on wedding favors and to use as a decorative accent on wedding stationery.

We also have lots of different colours of glitter tape in the Creative Studio at our Toronto store. If you don't see it in a colour or width that you need, just let me know and I'll try to order it in for you. You can see how I used the glitter tape in the bottom left picture. I added the glitter tape to the top of one of our tin containers to seal the lid and add a little sparkle to my packaging. A number or our customers have told me that they used the glitter tape as an inexpensive way to decorate their party invitations.

And one of my favourite new items are these glitter candle holders that come in two sizes (bottom right above). The small ones have coloured wax candles inside and the larger ones have white tea light candles inside. We have them in a number of different glitter colours as you can see here ...
I could not get all of the candles in the picture ... I'm missing the black glitter in both sizes and the brown glitter in the large size. Aren't these colours amazing?!

If you want to add a little glitter to your packaging or event planning ... just pop by and see what we have in store for you.

Wendy Addison products in the Creative Studio

Friday 6 July 2012

Have you been to our Toronto store lately? We have so many great new products in stock and since not all of them are available on line I wanted to share a few that I'm swooning over!  Our buyers were in New York a few weeks ago and purchased a line of products designed by Wendy Addison and they are amazing! 

Someone was asking me if we had silver glitter a few weeks ago at the Creative Evening ...
and I'm happy to say yes we do! And this is the best (and I'm not kidding when I say the best) glitter I have ever used. I purchased some of Wendy Addison's German Silver Emporium Pure Glass Glitter a few years ago when I was in New York and I treat it like it's gold! I only use it on projects that are really special to me because I have never seen it before in Canada and thought that it would be difficult to replace. We have it in four different colours in these super cute containers (believe me, you'll want to save the container when the glitter is gone !).

If you can't decide on one colour of glitter that's no problem, we have some glitter glass gift boxes that contain 6 different glitter colours. If you are not sure where to buy adhesive so that you can add glitter to your project don't worry. We have small containers of gel medium and two sided tape in the Creative Studio that are perfect for glitter.

We also have a number of Wendy Addison's Emporium Kits that contain an assortment of vintage papers, trim, flowers and glitter. There are a number of different themes. I keep looking at the Christmas kit because I know that I could decorate a number of special gifts with the goodies inside that treasure box!

Gift canisters designed by Wendy Addison are also in the Creative Studio! You'll just want to touch these containers when you see them. These are so beautiful. You can use them as they are for gift giving or add a ribbon and decorative sticker to keep the ribbon in place as you see with the glitter packaging in the picture on the left. I would buy these containers to use as a home decor item ... I'd fill them with some of my studio supplies and line them up on a shelf in my home office. I think there are 8 different label designs to pick from but the ones with vintage advertising and typography are my favourites.

And if you are a fan of letterpress stationery, we have an assortment of beautiful die cut letterpress cards that are packaged in muslin bags. I really like the way that these tags are packaged ... it's simple but beautiful.
All of these items are now in the Creative Studio space in our Toronto store only.

I also keep many of my blog and workshop samples in the Creative Studio. I'm usually in there on Mondays adding new samples and products or just moving things around. If you are in the area please pop by to say hello!

burlap inspiration

Wednesday 4 July 2012

I keep seeing burlap in wedding and home decor items. It makes me smile everytime I see burlap being used in new and creative ways. Burlap one of those fabrics that you can easily dress up or dress down like your favourite pair of jeans. Whether you are creating something rustic, natural, vintage or modern elegant ... it's easy to add a little burlap.

Here's a few of the projects featuring our burlap products that I have created recently ...

1. dress up a plain kraft box with burlap, ribbon and a silk flower! This would make a wonderful gift or favor.

2. frame burlap in inexpensive frames and add cling numbers to create simple table numbers for a wedding or event.

3. burlap bags become unique wedding favor when you add a fabric flower and personalized gift tag.

Looking for more burlap ideas for your wedding, event or home decor? Check out my "burlap love" pinterest board ... then come and visit us for your supplies!!


Pinterest inspiration links:

I hope that you a creative week!