{free} halloween tags and bag headers download

Friday 28 September 2012

Time for another one of my "free" downloads. This one is for Halloween and includes two different elements that will make your Halloween packaging "spook"tacular.

Here's what the download looks like:
Download the art here. Print these in colour on white cardstock for the best results. Note: This download is just for personal use. No commerical use please.
First, I created this fun little square tag. As you can see, there are four of these tags on the download.Cut them out, punch a small hole with a paper punch, add some twine and you are ready to attach the tag to just about any Halloween packaging project.

Here's what I did with some of the tags:

1. Oreo Pops. I showed you how to make these tasty treats a few months ago. For Halloween, I used orange candy melts and Halloween sprinkles. The oreo pops were packaged with small food safe candy bags. Black and white striped canvas ribbon was used to tie the candy bag closed at the top of the lollipop stick. The orange twine that I selected to attach the tag added that extra pop of colour to my packaging.
2. Marshmallows dipped in chocolate. I used the same packaging details for these marshmallow Halloween treats as I did with the Oreo pops. I showed you how to make the marshmallow treats for Valentine's Day. Again, some simple colour changes and these treats can easily be adapted to any holiday or party theme.
Tip: To create the "eyes" on the "pumpkin" marshmallow, simply cut licorice into tiny triangles.
3. Cupcakes. Here you can see that I added the Halloween tag to one of our clear cupcake holders with a dome lid. I tied the black and white striped canvas ribbon around the container and knotted the ribbon at the top. Using a small (not mini) clothespin that was decorated with black glitter tape, I was able to clip the tag to the top of the package.
Here's a side view to show you how I was able to get the clothespin to stay in place on top of the knot. The orange twine was added as a decorative element and to add some colour. We don't sell the glitter tape on line but it is available in the Creative Studio of the Toronto store.
The other item that I designed for the Halloween packaging download is this bag header. There are two of them on the download. Simply cut them out and fold them in half.
Tip: I use a bone folder to make sure that the fold looks professional.
When you are ready to add them to a bag, slip a clear flat bag inside the folded paper bag header and staple close along the bottom edges of the header.
Depending on what you put in the clear flat bags ... you can adjust how much of the bag is seen by folding any excess bag inside of the bag header before you staple the header in place. As you can see above, I used the same size of clear flat bag on all of my loot bags but they vary in length to make my packaging look professional. The back of the headers have a blank area so you can write a name on them. Which is a great idea if you are using these for loot bags at a party or on Halloween eve for family and friends.
I hope that you feel inspired to try some of these packaging ideas out for yourself. As always, all of these ideas can easily be modified to suit any holiday, party or wedding theme.

I will be demonstrating these projects and many more at the Creative Bag Halloween workshop next week on Thursday October 4, 2012. Everyone will be making one of these projects too so if you are interested in joining us just let me know because we still have a little space left.

diy tulle tutu tee shirt

Tuesday 25 September 2012

I have been wanting to show you how to make one of these cute tulle tutu tee shirts for a while and thought that Halloween would be a good time to share this idea. My youngest daughter, Robyn, had one of these when she was 5 and she insisted on wearing it everyday for months ...
Here's my little princess at age 5! Robyn is almost 13 and we still have the original tulle tutu tee shirt hanging in her bedroom.

What I loved about this is that the tulle tutu is sewn directly onto a plain white tank or tee shirt so it is one piece! The tee shirt can be worn with a pair of shorts or pants depending on the weather. This is a great project for a Halloween costume for a child, teen or adult. But I can also see making these for all of the guests at a princess or dance themed birthday party.

Before I show you how to make these, I am going to warn you that this project involves sewing! If you don't like to sew please keep checking this blog because I will show you how to make a "no-sew tulle tutu" in the near future. 

So here's how I made my tulle tutu tee shirt ...  
Gather your materials: tulle (mine was 18" wide), white cotton tee or tank top, sewing machine, white and brightly coloured thread, scissors, ruler and or measuring tape, pins. I also used a quick disappearing ink fabric marker to make sewing a breeze.
Note: 12" wide tulle will also work for this project because we are folding the wider tulle.

1. Measure and cut tulle.  First you will need to measure your tee shirt to find out how much tulle you will need to cut. The tulle will be sewn to the tee shirt at the waist so you need to measure the tee shirt in the waist area. If your tee shirt has a lot of stretch, try to stretch the fabric a bit  when you are measuring.

I measured the front of my tee shirt (10") and multiplied that number by 2 to get a total tee measurement of 20". You want your tulle to be very full so you need to double (for me that was 40") or triple (again for me 60")  your overall tee shirt measurement depending on how full you want to go. I only doubled  my tulle measurement for the sample I am showing you  but I think that the next one I make will be tripled. 

I used 18" wider tulle and cut two pieces of tulle that measured 40" each.
Note: If you are using 12" wide tulle you will not fold the tulle. And you will need to cut 4 lengths of tulle not two.

If you are using the wider tulle as I am you will need to fold your tulle in half length wise to find your centre point. I found it helpful to use a quick disappearing ink fabric marker to draw a line on the fold of the tulle. Pin the two layers of tulle together. If you are using four pieces of 12" tulle, you do not fold the tulle - but you can pin the tulle layers together at this point.

2. You will need to sew the layers of tulle together so that you can add gathers to the tulle. It is normal to do this with two rows of thread but I found that by using a heavier weight, brightly coloured thread on the tulle that I only needed one row of stitching. This thread will be removed at the end of the project so by using a bright colour it will be easier to see. If you use your sewing machine for this step (which I did) use the largest straight stitch you can. Stitch directly on top of the line (middle point of the tulle) that you just drew with the fabric marker.

Note: 12" tulle will need to be sewn about 1/2" from the top of the tulle to create your gathering stitches.

3. In photo three, you can see that I have gathered the tulle. To create the gathers I pulled the top thread so that the tulle would pucker. You want to do this with the thread so that the tulle is evenly gathered. Be very careful not to break the thread as you are pulling it to create the gathers!! The final measurement of the tulle along the stitching will be the measurement of your tee shirt (for me that was 20"). Knot the brightly coloured threads at each end when you reach the required length so that the gathers will stay in place. You may need to go along the stitching to make sure that the gathers are evenly spaced.

4. Now the tulle is ready to be sewn onto the tee shirt. I found it easier to mark on the tee shirt where I was going to sew using the fabric marker. Remember the tulle is going to start at the waist area. Now line up the tulle so that the brightly coloured stitching for the gathers lines up with the line you drew on the tee shirt. You will want to start at the middle front of the tee shirt and line up the middle of the tulle. The two ends of the tulle will end up at the centre back of the tee. You will have to carefully pin the tulle to the tee remembering to stretch the fabric slightly as you pin.

5. Once the tulle is pinned in place and you are happy with the way that the tulle is gathered it is time to do the final sewing. This time you will use a white thread so that your stitching is not seen. Stitch using a normal stretch stitch setting on your sewing machine and stitch right on top of the coloured thread.

6. Once you have finished sewing you will need to carefully remove the coloured thread with a seam ripper or pin. And now your tulle tutu tee shirt is ready to be worn!

As I said at the beginning of this post ... I think that this would be sweet as part of a girl's Halloween costume.

There are still about 15 seats available for the Halloween workshop that I will be hosting on Thursday October 4th, 2012 at the Toronto Creative Bag store. This project will be on display and you can see it up close as well as the other projects that I have been working on. If you are interested in attending just send me an email and I'll add your name to the list. You can find out more about the workshop by clicking here.


Just add a little blackboard paint for instant party decorations

Friday 21 September 2012


As you can see, I have been playing with blackboard paint and a number of products we have in the stores and online to create some elements for a Halloween themed party. Decorative plastic pumpkins, wood market trays and white paper doilies are easy to paint with the Martha Stewart blackboard paint that is available in the Creative Studio area at the Toronto store.


Here you can see my "before" materials. You can use a regular paint brush or a small foam brush to paint all of the items shown. I actually prefer the foam brush because there are less stroke marks and it's quicker!


I only used one coat of paint on each of the products that I painted using the foam brush. If you find that you need two coats that is okay too. I think that these little pumpkins would be great as place cards at a table for a Halloween themed party or for Thanksgiving! If you add your guest's name with chalk it is easy to remove the chalk and reuse the pumpkins again! 


If you like to use labels on your containers these blackboard painted doilies are perfect for Halloween. I tied ribbons onto the vases first and then attached the doilies to the vase using two sided tape. I wrote on the doilies before attaching them to the jars. And because I didn't want the chalk to smuggle when I was attaching the doilies I used white china markers instead of chalk. You get the same look as the chalk but it does not come off.


I've shown you before that you can paint our wood market trays and reuse them. Here's one of the deeper market trays painted with the blackboard paint and used to display Halloween lootbags. I found that the market trays dried very quickly and again only needed one coat of paint using a foam brush but you may want to add a second coat if you want to cover more of the wood grain.

Did you notice the Halloween bag headers and tags? I created them for a download and will share them with you next week ... so stay tuned!

Interested in attending my Halloween workshop on Thursday October 4th, 2012? There is still room ... click here to get more information.


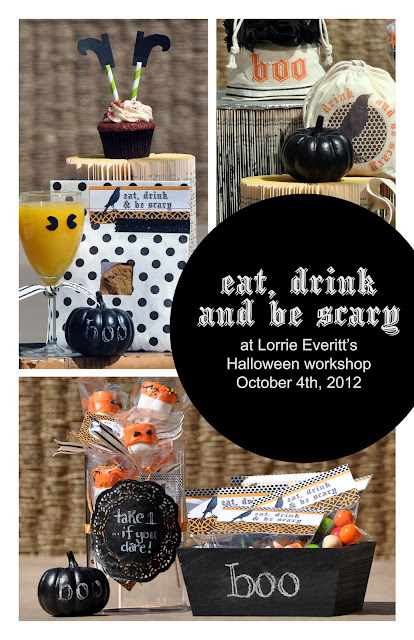
Eat, drink and be scary Workshop with Lorrie Everitt

Wednesday 19 September 2012

I will be hosting the next Creative Evening in the Toronto store on Thursday October 4th, 2012 and you are invited to attend!

The evening workshop is all about Halloween ... party ideas, packaging and display inspiration. We will be doing some make and takes again so you will have an opportunity to see and try out some of the coolest tools and products around.

The store closes at 5:30pm (regular hours) and we will re-open for everyone that has registered for the Creative Event from 6:00 to 9:00pm. 

There is no fee to register but registration is again going to be limited so sign up early!

If you are interested joining me, please send me an email

at lorrieeveritt@creativebag.com or call 1-800-263-1418 by end of the day on Monday October 1st so I know how many loot bags to make and chairs to set up!!
Enjoy private shopping after the class and receive 10% off as a special bonus.

If you have been to one of my spring workshops I'd love to see you again. If you have never been able to make a workshop before I hope that you will plan to join us and bring a friend!


{Creative Customer Guest Post} Bakery Inspired Birthday Party

Tuesday 18 September 2012

Today I have a special treat for you. I asked one of our Creative Customers, Dannyelle, to be a guest blogger and share some photos and details about her daughter's bakery inspired birthday party. I hope that you enjoy Dannyelle's inspiration ... now I'm off to the bakery to pick up some cupcakes ...


I’m Dannyelle from  Life is a Party. Life is a Party is a blog where I share my cooking, parties, entertaining, DIY projects and decorating ideas. I’m so happy to be with you today sharing some of the details of my daughter’s bakery themed birthday party.

We had a really “sweet” time celebrating with family and friends. We turned our living room into a pretend bakery and cafe for our little guests, complete with a kitchen to bake in, a front counter for customers to order their treats and tables for them to eat at.

I love the sweet bakery boxes, and mini shopping bags we used from Creative Bag. Along with lots of play food and saved packages of baking supplies we made fun flour and sugar bags by rubber stamping on to a muslin bag. See all the details of the pretend bakeshop here.

We also set up the dining room for our little bakers to decorate real cupcakes! This was a huge success. I loved using the bakery boxes for everyone to take their treats home in. Their other take-home was their own apron, which I sewed from tea towels and pretty ribbon; find the tutorial here.

We served a lovely buffet lunch, which included pink lemonade, of course, with the perfect pink polka dotted paper straws. We also came up with the “Sweetest Sweet Table Ever”, a bakeshop dessert table which included lots of amazing treats that I baked up for the party. I loved all the cookies, and marshmallow pops packaged up in the perfect little cello bags, all tied up with pink baker’s twine -how perfect! There were literally too many cute cupcake details to mention, but one of my absolute favourite was the sweet cupcake flower centre pieces, love the little bow on top too!

I hope you’ll come by Life is a Party to visit and read about all the how-to’s behind this fun party!


save the date for Lorrie Everitt's next workshop!

Sunday 9 September 2012


The days are starting to get a little cooler, the children are all back to school and it's time to start thinking about autumn celebrations and entertaining.
 
Whether you are looking for Halloween packaging or Halloween decor items, we have a spook-tacular collection of Halloween products in the stores and online now.
 
I have been working on some Halloween packaging and party ideas and I am looking forward to sharing them with you at my next workshop in the Toronto store. Please save the date of Thursday October 4th, 2012 if you are interested in attending. I will give you more information about the workshop and how to sign up in the next week.