Paper straw frames

Friday 31 May 2013

paper straw frame tutorial from creativebag.com
Here's an easy project that you can create in afternoon using our paper straws. Paper straw frames can be used as a decorative element at a wedding, shower or party. Use them on food and sweet tables to let guests know what is being served. Signs are especially useful for guests that have food allergies to nuts, dairy, glutten or whatever. 
paper straws from Creative Bag
Our paper straws some in so many beautiful colours. I especially love the striped ones. We also carry different patterns and colours seasonally. 

Here's how I made my paper straw frame:
paper straw tutorial on Creative Bag's blog
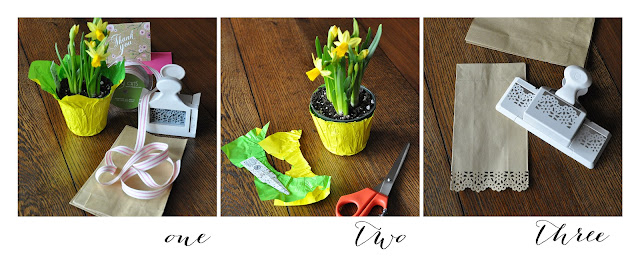
1. I used some old Ikea wood frames that I had on hand (any plain frame will work), paper straws, glue, scissors, a pencil and a Martha Stewart scoreboard. If you don't have a scoreboard you can use a ruler.
2. Figure out how long your straws will need to be to completely cover your frame. For my small frame, I cut my longest straws down to 6.75" and my smallest straws to 1". I used my scoring board to mark with a pencil where I would need to cut each straw and then simply cut the straws with a pair of sharp scissors.
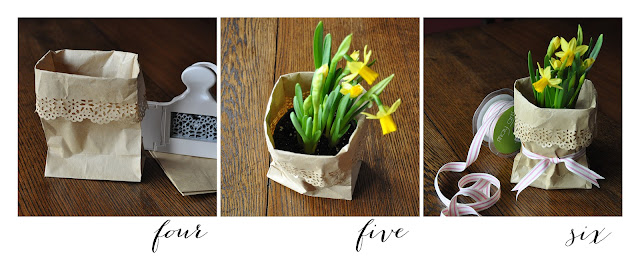
3. Once you have all of the straws cut to fit your frame you can start to glue the straws to the frame. I put glue on the frame and added the straws in the following order:  long straws at the top, short straws on both sides and then the long straws at the bottom.
4. Let your straws dry and you are done! I told you this was easy.
paper straw tutorial from Creative Bag
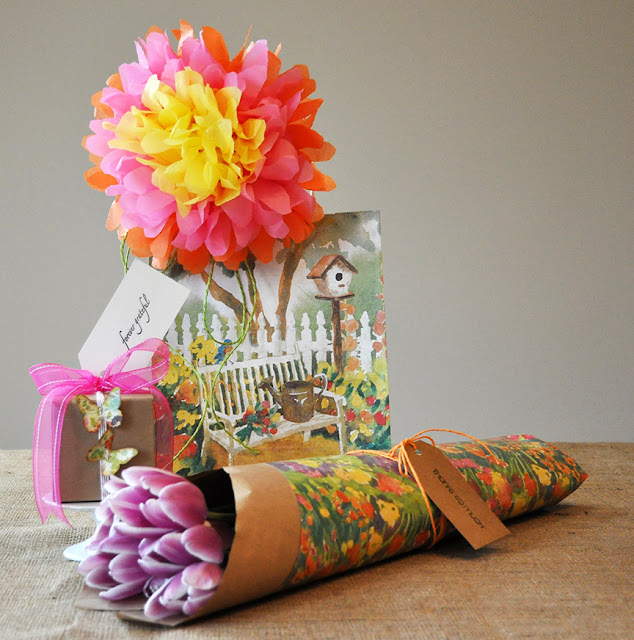
I used one colour of straws in this sample but you could easily do this project with a mix of different colours to match your colour theme. Have fun and experiment with straw placement on your frame.

Just so that you know, when I'm creating a project for the first time it sometimes takes me a few tries to everything perfect. I'm a little picky when it comes to little details ... I'm a Virgo, need I say more? ... and I thought that I'd share with you why I recommend using a scoring board vs a ruler for this project. 
Creative Bag blog post on making paper straw frames
Pictured above are my first and second attempts at making these frames. In my first attempt with the green and blue straws I used a ruler to measure my straws and I found it difficult to be consistent - especially on the 1" pieces. Check out the shorter straws on the sides! In my second attempt you can see that when I used my Martha Stewart scoreboard to mark each straw, I was able to be more accurate in my markings and my finished piece looks a bit more polished. 


Chinese Take Out Boxes and Customer Inspiration from Jacquee of "I Sugar Coat It"

Wednesday 29 May 2013

I love Mondays. 

I know that a lot of people don't like Mondays but I do because it is the day that I'm at the Toronto store. I get so excited when I walk around the store and get to see all of the amazing new products that have arrived on the shelves. This week the staff were setting up an incredible display featuring many of our new kraft, burlap and lace products. They are still loading many new products onto the website and I will share them with you in another post. If you are planning a vintage or rustic themed wedding or party this summer you have to visit our stores soon.

The other reason that I love Mondays is that when I'm in the store I get to talk to many of our customers and see what products they are loading into their shopping carts. This week I noticed a number of people with our Chinese take out boxes in their carts. 

Chinese take out boxes are always a popular product at this time of year as many brides like to use these for wedding favors and packaging for sweet tables. We have the traditional white take out boxes in a variety of different sizes ...
and we also carry a number of unique takeout boxes as well. The clear and kraft take out boxes (shown in the top photo) are two of my favourite take out boxes to decorate for wedding and party favors. Our Chinese take out boxes are also available in many different colours and patterns and you can see them all on our website here.

I especially love to see what our customers have been doing with our products and I was blown away this week when I received an email from one of our very talented customers - Jacquee from "I Sugar Coat It".  Jacquee packages and photographs her beautiful sweets in our products and I just have to share some of my favourites with you today. 
 
This beautiful cake was created for a friend's bridal shower and was cleverly packaged in one of our new Parisian collection bakery boxes.

I love Jacquee's photography. You really want to have a (big) slice of that cake! The cake stand in this picture is from our new Rosanne line of dessert servingware. I over heard a customer the other week say that this area of our Toronto store was her "happy place" and I have to agree. 
Check out how Jacquee packaged her macarons in our macron boxes. I love the way that she added her logo to the tiffany blue macaron box. 
Again, the photography for these sweet treats is both beautiful and yummy!  The patterned paper behind the macarons is from our new Dahlia Collection.
And one last photo from Jacquee's blog that I just had to share. I pinned this picture of her strawberry glazed mini doughnuts as soon as I saw it. I loved the use of the paper straws, the colours and the way the doughnuts were styled. But what I loved the most is that these mini treats are lactose-free!! I'm lactose intolerant and so I'm always on the look out for lactose-free recipes - especially desserts. I can't wait to try this recipe out. I just need to find an excuse to make them and present them like this on the paper straws ... maybe for a late night treat  at the cottage this summer!

Jacquee's blog is a chronicle of her successes (and failures) as she explores sugar in all it's forms. She has lots of great recipes and I love how she shares her stories on her blog.I hope that you will pop over to check out Jacquee's website. Tell her Lorrie sent you over!

If you are looking for more inspiration for your packaging projects please check out and follow our Creative Bag Pinterestboards. I am adding new pins daily and always on the look out for new ideas using our products!


Burlap Tote bag centrepiece and David Tutera's Casual Elegance Collection

Thursday 23 May 2013

burlap packaging ideas from Creative Bag Co. Ltd
Looking for an unusual floral centrepiece for a wedding, shower or party? 

How about this burlap tote bag centrepiece? It's super easy to create. Add a chalkboard tag to the handles you can write a table number or a simple message.

Here's what you need to create this simple centrepiece in 15 minutes or less:  
burlap packaging ideas from Creative Bag Co. Ltd
I filled one of our tall square glass vases with water and flowers and placed them inside a small burlap tote bag. Then I tied one of our new chalkboard tags with jute string to the bag handle. A simple vintage paper flower that I made and glued to a clothespin was clipped onto the jute as an extra detail. 

Lorrie's tip: It's easier to write on the chalkboard tag before you attach it to the burlap bag handle. If you want the handles of the bag to stand up straight, you can add a piece of wire into each handle for support.

burlap packaging ideas from Creative Bag Co. Ltd
Burlap and chalkboards are popular because there are so many ways to use them. Just like a pair of jeans and a white tee shirt ... they never go out of style and you can dress them up or dress them down depending on how you accessorize them. 

If you like burlap and chalkboards, you are going to love David Tutera's Casual Elegance Collection. We just received our first shipment of this collection and as expected, it is selling quickly.burlap packaging ideas from Creative Bag Co. Ltd
 If you are looking for something that looks diy but actually is not -  there's lots of that in this collection. Like the burlap and lace guest book and matching pen above.
burlap packaging ideas from Creative Bag Co. Ltd
Create your own custom message burlap banner using the pre-lettered burlap pieces that are in the burlap banner kit!  Just string the banners together and off you go! 
Don't waste time looking for vintage looking frames for table numbers at antique shops and second hand stores when you can purchase them in packages of 4. Three sizes of lace paper lanterns will glow in the dark when you add LED lights on a string. Anything on a stick is a good idea and I think that you will agree when you see the two different sizes of chalkboard signs in this collection. Hemp cord will come in handy for lots of diy projects. 
burlap packaging ideas from Creative Bag Co. Ltd

If you are looking for favor packaging supplies this collection has some cute pieces and ideas to get you started in the right direction. Check out these metal pails, mini berry baskets and kraft laser cut favor boxes. The matching kraft napkin rings, kraft gift/escort tags and paper straws are adorable. And if you want to create you own paper straw flags there is a diy kit to print your own design on your home printer using the included template.
burlap packaging ideas from Creative Bag Co. Ltd
Add rustic charm to your bouquet and centrepiece arrangements with burlap and lace wraps. The bouquet wrap is made of burlap and lace and has an adhesive back, making it quick and easy to wrap up bridal bouquets. Lace jar wraps were designed to fit perfectly around a mason jar. Tie jute and lace ribbons around chairs, vases or whatever you want to give them a little extra charm. Love the look of burlap flowers but don't have the time or skills to make them yourself? You are going to love these adorable burlap flower accents! The beautiful white butterfly clips with pearl accents are easy to attach to favors, centrepieces, chair backs or whatever you wish.


Pretty Kraft-It-Yourself Favors

Thursday 16 May 2013

kraft favor packaging supplies from Creative Bag Co. Ltd.
Basic kraft boxes and bags can make the prettiest favors when you embellish them with ribbons, tags and a simple die cut paper shape. 

I love the look of black and white with kraft. I would describe this combination as simple, elegant, natural, modern, organic and rustic. 

I added paper flower and birds that I created using vintage book pages to my favors. I think that these would make wonderful wedding favors for the diy bride would is looking to add a personal touch to her wedding. The only hard part is figuring out which kraft box or bag to use!

kraft take out favors from Creative Bag on the Creative Bag blog
Our kraft take-out boxes have just arrived! 

I wrapped a wide black satin ribbon around the box and tied it at the top without a bow. You can see my tutorial for making paper flower here. I glued a vintage paper flower to small wood clothespin so that I could just clip it onto the ribbon. You can make simple paper tags to attach to the wire hanger on the take-out box. Say "thank you" or if you want to your favors to do double duty, add a guest's name to each tag so everyone will know where to sit.

kraft round favor boxes from Creative Bag on the Creative Bag blog
Mod boxes come in lots of sizes and colours ... the kraft ones are my favourite.

Similar to the take-out box favor, I wrapped a wide black satin ribbon around the box, tied it at the top without a bow and attached a vintage paper flower on a clothespin. I used a Martha Stewart paper punch to decorate the bottom of a plain white tag and inserted it under the ribbon. Again, you can use the tag to add a thank you message or add a name to double as an escort card. 

kraft boxes for favors from Creative Bag on the Creative Bag blog
We have an assortment of jewellery boxes available ... these kraft ones are a basic in my packaging supplies.

I tied a wide satin black ribbon and a grosgrain black and white stitched ribbon around the box. I attached a bird shape that I die cut from vintage papers to a small clothespin and then clipped it onto a small branch. The branch was woven between the ribbons to give this package an interesting look. You could easily tuck branches with fresh blossoms if you are making these up the day of your event. 

paper bags for favors from Creative Bag on the Creative Bag blog
You've seen me use these kraft bags many times before. They are easy to 
make and if you looking for a a larger favor that will have a big impact these are perfect!

I used a Martha Steward paper edge punch to decorate the top of the bag. You can see my tips for using this punch on this post. I also used a tool called Sew Ribbon that you can see here to punch slots into the bag. Then I sewed a black ribbon through the slots to close the bag ... make sure that you add whatever you are putting into the bags into the bags before adding the ribbon! Another one of my vintage paper flowers that was glued to a small clothespin was added to the ribbon. You can use the clothespin to hang a gift tag or escort card to your bag favor. 


let's get this party started with candy striped boxes, creative packaging ideas and Lorrie Everitt's free downloads for labels and tags

Thursday 9 May 2013

Creative Bag party packaging and party supplies
We are headed into that time of year when it is time to celebrate the end of school. Whether you have kids finishing their first year of kindergarten or their last year of elementary school, high school, college or university ... it's time to party!

At Creative Bag we have all of your packaging supplies - bags, boxes, ribbons, tissue and wrap as well as everything that you need for decorating, food presentations and sweet tables! 

I love all of the new chalkboard signs that we have in stores right now so I created a few free downloads using the chalkboard theme to use with our products. We recently received a new collection of candy striped boxes. The collection has four different boxes(mini and extra mini, pillow and mini take out)  and is available in six colours.

Aren't they adorable? I especially love the little mini take out boxes. I knew they were going to be a hit when I brought some home to show my teenage daughters and they started fighting over them. 

Creative Bag packaging supplies for party favors
You can see in the picture above that I used my "I love you to the moon and back" circle tags to decorate some of our beautiful matte finish bags by clipping them to the bag handles using small wood clothespins. I also added my gift tag to a glassine bag that I  filled with wood cutlery, a paper straw and a napkin. The adorable chalkboards signs with clothespin backs are available in two sizes - the large one is clipped onto one of our square vases and the small ones are clipped onto the handles of the mini take out boxes.  The chalkboard arrow sign comes with the stick and is a must have for any sweet table presentation!!
Creative Bag free download for party favors
This download can be used for anytime of year. You can download the pdf file here. 
Please remember that all of my downloads are free for personal use only. 
Creative Bag free downloads for party favors
I also created another download that has the chalkboard theme and can be modified by you to use for your graduate. 

Creative Bag free downloads for party favors
(top right) Bitty bags were embellished with my celebrate tag. I folded over the top of the bag, punched two holes through all of the layers and tied the bag close using paper twine.
(middle left) I used a Martha Stewart paper edge punch to give a lace effect to our glassine bags. Baker's twine, one of my class of 2013  tags and a second gift tag that could double as an escort card were used to finish off the bag. Inside the bag is a paper straw, napkins and a smaller bitty bag that contained wood serving utensils.
(middle right) One of my gift tags was attached to a mini candy striped box using a small clothespin and paper twine 
(bottom left) The wrapper was designed to fit a clear pail.  Download the eps file if you want to insert a photo in the frame area - you will need Photoshop to do this on your computer. Download the pdf file and you can add text in the white frame area to personalize the art. 
(bottom right) I attached one of the tags to a wood stick so that it could be used as a cupcake topper. 
Creative Bag free downloads for party favors and tin pails

Quick note on printing these downloads. I used white cardstock to print on my home printer. Make sure that you print size as is. If you want to use a circle paper punch to cut out the circle tags - I used a 2.25" punch. 


kraft paper bag gift wrapping idea just in time for Mother's Day

Tuesday 7 May 2013

Creative Bag floral packaging ideas using paper bags
It's easy to make small potted flowers look extra special by packaging them in paper bags. I like to buy potted bulbs in the spring for my home and to give as hostess gifts. I dress them up using paper bags, paper punches and ribbon

Here's how I do it:
Creative Bag floral packaging tutorial  using paper bags

one. Gather your supplies: small potted flowers, paper bag, paper edge punch, ribbon and scissors.
two. Trim the excess plastic wrapper on the pot.
three. Using a edge paper punch - we sell these in all of our stores - punch the top edge of your bag as shown above. You will be going through four layers of paper on the outside edges so  keep in mind that you will have to press down hard.
Creative Bag floral packaging tutorials using paper bags

four. Gently roll the top of the bag down to form a cuff.
five. Place the potted flowers inside the bag.
six. Scrunch the bag in a little about mid way down and add a ribbon to decorate. 
And you are done! 

Creative Bag floral packaging ideas using paper bags
Looking for pretty packaging supplies for Mother's Day? Check out our Watercolor Garden Collection. I think that the watercolour printed paper bags look great with my brown paper bag flowers. I added a small tissue paper pom pom to the printed bag. You can find the tutorial for these here

Mom will love the extra effort you put into wrapping up her gifts. And you don't have to tell her how easy it was to do ... unless you want to!

Creative Bag floral packaging ideas using paper bags

We have so many new products that have arrived into our stores and I can't wait to share more ideas with you - and a couple of free downloads. 
Stay tuned for some grad party ideas. 

Creative Inspiration. Pretty floral bouquet packaging using wrapping paper.

Wednesday 1 May 2013

Creative Bag floral packaging ideas using wrapping paper
 April showers bring May flowers. It's easy to make a bouquet of flowers ready for gift giving by using wrapping paper and twine.

This simple project will take a basic floral bouquet from ordinary to extraordinary!
Creative Bag floral packaging ideas using wrapping paper
So let's gather our supplies: kraft wrapping paper, patterned wrapping paper of your choice, ribbon or twine, a plastic candy bag, paper towel and scissors. Creative Bag floral packaging ideas using wrapping paper
1. You need to "water-proof" your stems so that the wrapping paper does not get soggy. I wrapped a wet paper towel around the ends of the stems to keep my flowers from drying out and then placed the stems into one of our clear candy bags. A piece of ribbon or twine was tied near the opening of the clear bag. (see top photo above)
2. Wrap a piece of kraft wrapping paper around the flowers so that it creates a bit of a cone shape. You can use a small piece of tape to hold the wrapping paper together if you wish.
3. Now wrap a piece of decorative wrapping paper over top of the kraft paper. The kraft paper will hide the plain white back side of the patterned paper and adds a decorative element with the double wrapping. Tie ribbon or twine a few times around the package to secure the wrapping paper. Add a gift tag, tie a bow and you are done!

Tip:  I folded the bottom end of the cone over once and tucked it into the opening so that the flowers could not fall through the end.

Creative Bag floral packaging ideas using wrapping paper

The reason that I used kraft paper wrapping paper with this project is because I knew that I was going to use a kraft gift tag and I wanted a more natural, organic look for this packaging project.  If you want a bolder look, you could have used solid wrapping paper in a colour to co-ordinate with your pattern instead of kraft paper.

Creative Bag's watercolour garden packaging collection
I used a beautiful wrapping paper from our new watercolour garden collection that has just arrived in our stores and online. It works with so many beautiful colours you will be able to find lots of ribbons and tissue paper to co-ordinate with this collection.