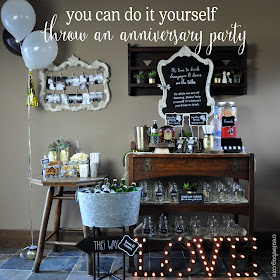
This is part two of my diy anniversary party and today is all about the drink station.
I think that you should be able to enjoy your party so unless you plan hire someone to tend bar, a self serve drink station is my favourite way to go.
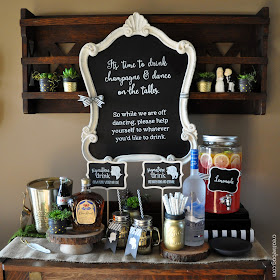
I created this blackboard sign and hung it above the drink station so that everyone would know it was a self serve bar. I glued the same ribbon I used on the sweet table to the frame.
The art to recreate the sign is included in the printables you can download for free in my last post. You may recognize this blackboard sign from another party set up.
Signature drinks are a nice way to personalize your drink station. I created the signature drink signs on larger blackboard signs on sticks.
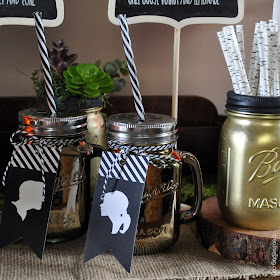
More gold spray painted mason jars spray were added to the set up to display paper straws and succulents. I used the birch paper straws to decorate the cake pops on the sweet table so it made sense to use them again at the drink station. Another decorative detail from the sweet table set up that I incorporated into the drink set up is the use of rustic wood slabs.
Lorrie's tip: Don't set up complicated signature drinks at a self serve bar. Make it something personal that is easy for guests to mix themselves.
Lorrie's tip: Don't set up complicated signature drinks at a self serve bar. Make it something personal that is easy for guests to mix themselves.
We have an assortment of mason jar mugs with a metallic finish daisy lid and plastic straw in select stores (until quantities last). I tied gift tags from my party printables to two of the metallic mugs to add to the signature drink theme.
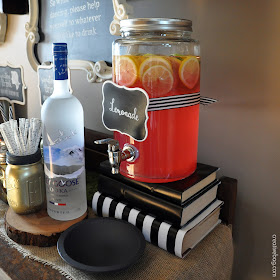
I filled one of our drink dispensers with lemonade and placed it on top of a stack of books that I covered with wrapping paper book jackets. I placed a bowl under the spout to prevent lemonade spills on the burlap table runner and furniture.
Lorrie's tip: The lemonade chalkboard sign was attached to the ribbon on the drink dispenser using magnets. I glued a magnet on the back of the chalkboard sign and used a second magnet behind the ribbon to keep the sign in place.
Lorrie's tip: The lemonade chalkboard sign was attached to the ribbon on the drink dispenser using magnets. I glued a magnet on the back of the chalkboard sign and used a second magnet behind the ribbon to keep the sign in place.
Our mason jar mugs are perfect for parties and they make great favors. Guests take them home and you don't have dirty dishes to wash in the morning - bonus!
We will have marquee letter signs arriving soon. Marquee signs are a great way to light up a drink station at night.
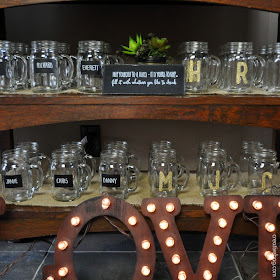
Here's a closer look at the mason jar mugs. I added blackboard sticker labels for the guys and added their names using a chalk marker. For the girls I added gold glitter letter stickers to co-ordinate with my black, white & gold colour theme.
The chalkboard sign lets guests know that they can keep the glasses and reminds them that they can serve themselves!
I also set up a small snack table beside the drink station with peanuts, pretzels and popcorn.

Square glass containers were filled with snack foods. Ribbon decorated the glass containers and small chalkboard signs with clothespins helped identify food for people with allergies. Our new line of party food containers are the perfect size for guests to fill (and refill) with snacks.
Above are some more close ups of the gold spray painted mason jars. I added this gold sparkle cake topper to the succulent floral arrangement.
Lorrie's tip: If you have room to serve lemon and lime slices to your drink bar use additional square glass containers to display them.
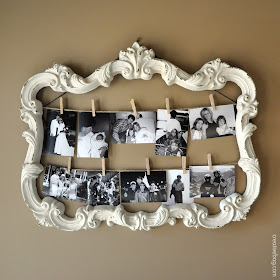
I hung an ornate vintage inspired frame and filled it with black and white photos. After the party you can use the frame as it is or as a way to display whatever you want.
Lorrie's tip: Convert all of your photos to black and white to co-ordinate with the colour theme. I considered spray painting the frame gold as well to work with the party colour theme but ended up leaving it white to match my home decor for after the party.
I added black and white balloons filled with helium to the drink station. The gold mylar tassel is from this tassel kit . If you want to add a long strand of tassels to the balloons you need to have lots of small balloons (way more than three) or one giant helium filled balloon to hold up the additional weight of the tassels.
I tied the balloons to a mason jar to keep them from floating away and so I could position the balloons wherever I wanted.
Here's one last look at the drink station. If you missed my anniversary party sweet table post you can find it here. Check back later this week for the third and last post about this diy party.
BTW - you can grab the party printables here.





No comments:
Post a Comment
We love to hear your comments!