

Are you thinking about hosting an anniversary party? Looking for some inspiration? Would you like to include some easy diy projects to make the party a little more personal? How about some party printables that you can download for free? If you've answered yes to any or all of these questions keep reading!
For the next few blog posts I'm going to share my ideas for hosting an anniversary party. I designed a number of printables for my party that you are welcome to use and personalize for your own party.
Inspired by my 2016 Kate Spade daytimer, the colour palette is black & white with gold accents. Since the summer months are the most popular time of year to get married, I decided to plan the summer anniversary party at the cottage. Succulents, moss and natural wood elements added a rustic vibe to the contemporary the black, white and gold theme.
Today's post is all about the sweet table. (yum!)

Who doesn't love a sweet table? For this anniversary party I wanted to have a variety of different baked goods and a small cake. So I set up a small table and used wood market trays to organize the sweet treats.
All of our sweets were created especially for us by Bake Sale. They were amazing to work with and all of the baked goods looked (and tasted) great. I gave the Bake Sale team my ideas about the party decor, my printables and what kinds of baked goods I wanted and left the rest up to them. I was so excited to see all of the baked goods come together the day of the set up.
Lorrie's tip: Save time and a lot of work by ordering baked goods for the party instead of making them yourself. Use the time you saved baking on making chalkboard signs and decor elements for the sweet table.

I really wanted a mini naked cake for the party to display on a birch cake stand that I made. The cake is sitting on a cake pad - not directly on the birch slab. Bake Sale added the mini faux succulents and a gold "x" and "o" cake topper.
The cake is the focal point of the table so I used a variety of things to give it height. I started at the bottom by using two small, deep wood market trays to hold up one extra large shallow wood market tray that was lined with moss. Black and black & white striped wrapping papers were used to create book jackets for old books that I then stacked in the middle of the tray. The birch cake stand was placed on top of the stack of books.
The art in the white frames are part of my party printables. The Mr. and Mrs. silhouettes can easily be personalized with your names before or after printing. I spray painted a metal "&" in gold to match the other gold elements on the table.
Lorrie's tip: If you want to use a patterned wrapping paper for your book covers try to add a few book covers in a co-ordinating solid paper so when you stack them they don't look too busy.

Bake Sale created three different sugar cookies to fit our square glass containers. The glass containers were placed on a long wood market tray lined with moss. The Mr. and Mrs. silhouettes from my printables were the inspiration for two of the cookies. I didn't want numbers on the third cookie, so it features the saying from my graphics (minus the kissing Mr. & Mrs.).
Lorrie's tip: You don't have to put all of the baked goods on the sweet table when you are setting up. For example, if you have 45 cookies just put out 15 to 20 cookies and keep refilling the containers so the table presentation looks full for most of the evening. This is a great idea especially if you are serving food outside.

Cupcakes were lined up in a shallow wood market tray lined with black wrapping paper.
Bake Sale made the cupcakes in white cupcake liners for me and I doubles each cupcake with black and white polka dot cupcake liners on the tray to match the party decor. Small gold heart cupcake toppers that match the "x & o" cake topper were inserted into most of the cupcakes. Two of my printable tags were made into cupcake toppers with the help of some gold paper straws and glue.
Chalkboard signs are both decorative and functional.


Bake Sale created cake pops with polka dots to co-ordinate with my printables. I cut up our birch paper straws and used them to cover the cake pop sticks before placing them in the deep wood market tray filled with floral foam and moss. These birch straws have a two little hearts in the paper and make a nice detail for a rustic anniversary party or wedding.
I also added chocolate bars to the sweet table. I wrapped regular size chocolate bars in gold metallic tissue paper before adding the wrappers from my party printables.
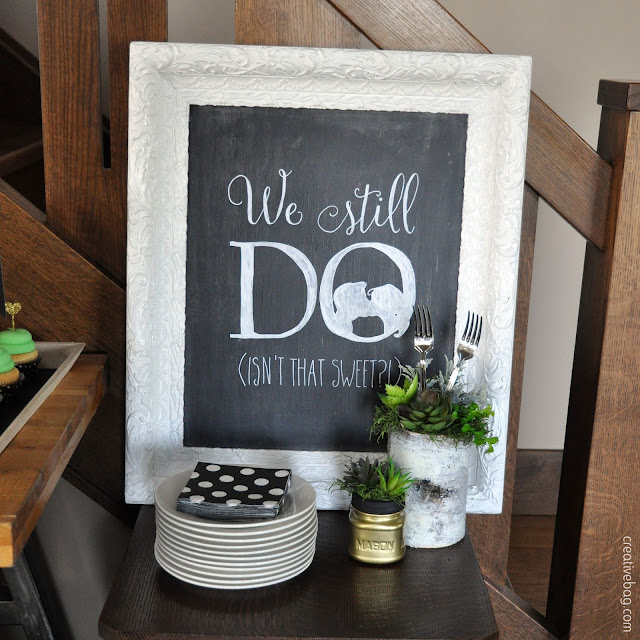
This large chalkboard sign was an easy diy project. The frame was found at a second hand store and painted white. I purchased a wood panel to fit the frame opening and painted it with chalkboard paint. You can enlarge the saying from my party printables to fit any size of chalkboard. I prefer using chalk markers instead of chalk on these kinds of signs so that my artwork does not rub off easily. You can find my tutorial for writing on chalkboards like a chalk artist here.
I used succulents and moss to create all of my floral arrangements for the party. Mason jars were spray painted with gold and black paint. I added Mr. and Mrs. forks and gold cake toppers into some of the floral arrangements as decorative elements.

The cottage ceiling above the sweet table was too high to hang paper lanterns and tissue paper pompoms easily so to keep things simple I arranged them underneath the table. Everything was placed far enough under the table that no one was stepping on them.
I hung a gold glitter "happy" banner on the front edge of the table and added diy paper bows from my printables.
I hung a gold glitter "happy" banner on the front edge of the table and added diy paper bows from my printables.

Details, details and more details.
I used Krylon's 18 kt gold plate spray paint on glass and metal elements for the party.
Gold glitter tape was added to paper bows to give them a little extra sparkle.
I thought about spray painting the imprinted Mr. and Mrs. forks that I used in this floral arrangement gold but I held off so that they could be re-used after the party.

You can make your own wood cake stand using a birch slab, a small wood bowl and a couple of screws. The screws need to be large enough to go through the bowl and about half way through the wood slab. Tip: I pre-drilled the holes for the screws in the bowl.
We sell birch slabs and birch vases in stores only - while supplies last.

The chocolate bar wrappers are included in my party printables.

You can download all of the printables for the party here.

Here's a final look at the sweet table set up. I've also created a new Pinterest board for anniversary party ideas you may want to check out too!
My next post will be all about the refreshment station ...

I hope that you'll check back for more inspiration. Cheers!
You can download all of the printables for the party here.
Here's a final look at the sweet table set up. I've also created a new Pinterest board for anniversary party ideas you may want to check out too!
My next post will be all about the refreshment station ...
I hope that you'll check back for more inspiration. Cheers!


⋅2 comments
Do you have a printable for the P (heart) L on the wood bin?
Hello AVoss - sorry there is no printable for the P (heart) L design that was wood burned onto the birch container. It was done freehand.
Post a Comment