One of our buyers is getting married this month and we are all feeling the excitement as she completes her last minute plans (and projects) for her wedding day.
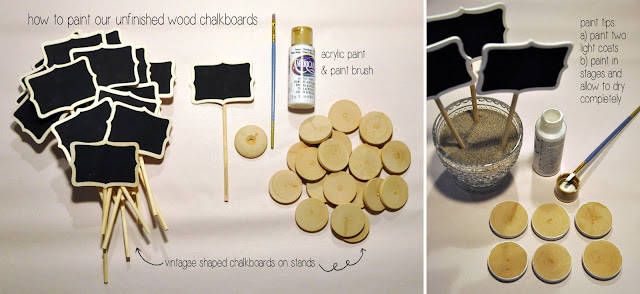
We have these adorable little vintage shaped chalkboards on stands that our bride wanted to use for her dessert table and as table numbers but she felt that the natural wood coloured signs were not the right colour for her wedding decor. (Note: We have ordered these in white but they will not be in stock in time for the wedding date).
I was already asked to do the writing on all of the chalkboard elements for the wedding and when we were looking at which chalkboards to use I told her not to worry about the colour of the chalkboard signs because it would be easy to paint these whatever colour she wanted using acrylic paint. And that is what I did!
Here's how you can do it too ...
Here's how you can do it too ...
I used white acrylic paint but you could do this with any colour that you want ... except maybe black. You could even use a metallic paint if you wanted to.
Here's my tips for painting:
a) paint two light coats instead of one heavy coat. This will take longer but it's worth the effort and time.
b) paint in stages and allow to dry completely. I painted the edges of all of the bases
first (both coats), and after they were dry I painted the bottoms and then the tops. The signs were done in a similar manner and I used a container filled with sand (sugar or uncooked rice will work too) to allow them to dry.
I knew that I would not be writing on these chalkboards the day of the wedding at the reception hall so had to figure out a way to make the lettering somewhat "smudge-proof" so they could be packed and moved around. Regular chalk was not going to work for this project and I started looking into chalk markers. I actually had a difficult time finding chalk markers locally so we have ordered a few different kinds to test out in our Toronto store ... they will be arriving soon (I will keep you posted). I manage to find a Bristo Chalk Marker and it easy to use. I even came up with three different ways to use my chalk marker!
1. Just like you would any marker - shake it, get the ink flowing and then (neatly) write directly on your chalkboard surface. The ink is smudge proof once it dries and you can erase it with a damp cloth. If you check out my last post you will find some font styles that you can "copy". The 6mm marker that I have been using is not as fine as I would like for the mini chalkboards and if you have a lot to write it could be a problem.
2. My chalk marker work really well with stamps. I did a lot of testing and most letter and number stamps I have worked great with this method. Simply trace the stamp image with the tip of the marker to add a thin coat of ink on the stamp and then stamp away! I prefer clear stamps so that I can easily see where I am stamping but you can try this with other types of stamps. The best part about using this chalk ink is that if you don't like the way the stamped image looks simply use a damp paper towel to wipe it away and try again!!
3. This last method is what I used on the wedding signs because I had a lot of words to get on some of the signs and the 6mm marker was just a little too thick and I had to print. I'm hoping to find some fine tip chalk markers but for now this method works really well. I was able to create a "puddle" of chalk ink on a glass tray by pressing down on the tip of the maker. Using a fine paint brush, I used the chalk ink like paint and wrote on the chalkboard. You need to do this while the ink is "wet" so if it drys before you have finished just create another puddle and continue to write.
Above photo: You can see that I used the chalk marker ink with a paint brush to create the "baked Raspberry" sign. Both the "5" table number sign and "thanks" chalkboard label on the favor packaging were created using chalk marker ink and stamps.
The new Weddingbells magazine is out! You can find it on newstands today. I was thrilled to see the diy confetti poppers project using our push pop containers. Don't they look amazing! I love the colours and graphics.
Looking for more wedding diy projects? Check out our Pinterest diy wedding board!
Looking for more wedding diy projects? Check out our Pinterest diy wedding board!


⋅1 comment
wow, such a great tutorial! I need one of these Chalk markers. such great ideas :)
Post a Comment