

Wasn't that a party last night? We had another Creative Event in the Toronto store last night and from the feedback and emails that I have received, I think that everyone had a good time! I was so proud to see everyone to go home with their completed projects - a fun resin flower ring and a beautiful tissue paper flower pom-pom.
As promised, here is a little tutorial that I created for making the tissue paper flower pom-poms. We are planning to make kits that you can buy complete with 8 sheets of coloured tissue paper, twist ties and instructions. They will be in the stores soon - I'll let you know when they land!
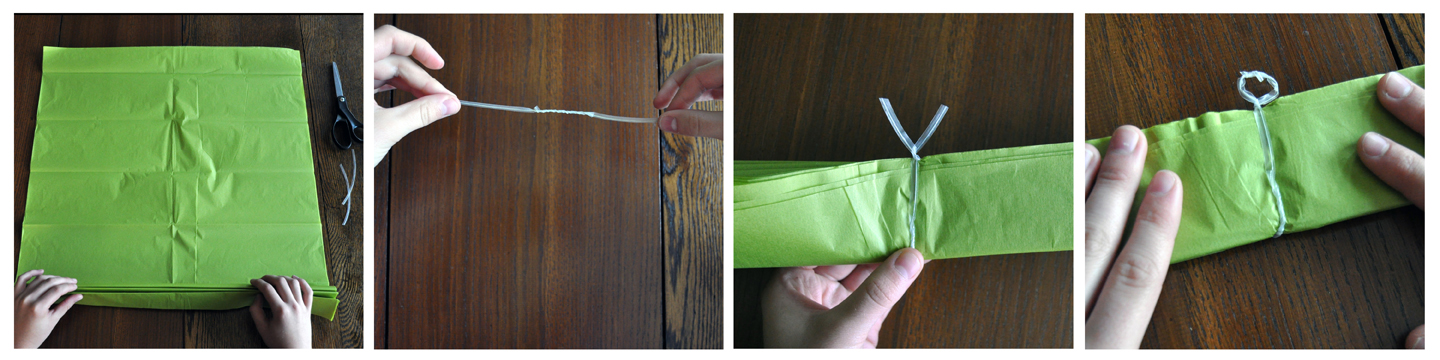
To start you will need tissue paper in solid colours of your choice, twist ties or floral wire, scissors and monofilament or ribbon (to hang).
To create a large flower pom-pom use 8 sheets of 20"x 30" tissue paper.
To create a medium size flower pom-pom use 8 sheets of 15"x 20" tissue paper (cut the 20"x 30" sheets in half).
Step 1. Stack eight sheets of tissue paper together. On the shortest side, start making accordian folds about 1 1/2" for the large pom-pom and just a little more than 1" for the medium pom-pom. You want to crease each fold as you go. When all of the tissue has been accordian folded, fold the tissue in half and crease again.
Step 2. If you are using twist ties you will need to join two together to make one long twist tie.
Step 3. Fold the twist tie in half and slip it over the centre of the folded tissue. Twist (as shown above).
Step 4. Now take the two ends of the twist tie and twist again to form a loop. This loop will come in handy later when it is time to hang the pom-poms.

Step 5. Using scissors, trim the ends of the tissue into rounded or pointy shapes. You may want to cut a few layers at a time because the tissue is quite thick. Don't worry if the ends don't look perfect ... once you open the layers it will look great.

Step 6. Separate the layers gently by pulling away from the centre one layer at a time. You don't want to tear the tissue so take your time doing this.
Step 7. After separating one half of one side, do the same on the other half of the first side.
Step 8. Flip the pom-pom over and repeat steps 6 & 7 on the other side.
Step 9. And now you are ready to hang! Use monofilament (fancy name for fishing line) or ribbon and attach to the twist tie loop that we created.
Here's a couple of tips if you are making a lot of these for a wedding, party or special event.
(a) Make all of your tissue paper flower pom-poms ahead of time but only until Step 5. Plan extra time to complete the majority of the pom-poms where you are having the party. The pom-poms are quite large and difficult to transport. They also get damaged easily if they are piled on top of each other or stored in boxes. I'd suggest making a few of them before the event so you know how to make them and that way you will have a couple of examples to show whoever is helping you to complete the final steps.
(b) I like to mix the large and medium sized flower pom-poms together with paper lanterns. Whether you are making everything in one colour, two colours or lots of colours, the varying sizes look great together.

Here's some great examples of these tissue paper flower pom-poms that I have pinned to my pinterest boards.

Would you like to make one of these tissue paper pom-poms yourself? I have a few extra kits left over from the Creative Event last night and I'm going to make up a couple of loots bags as a giveaway on the blog. To enter the giveaway, just become a follower on the blog and leave me a comment on this post for a chance to win. I'll pick the winning names on May 31, 2012!


⋅4 comments
I love tissue paper flowers. They add so much to an event, and are so easy to make. I used them last year to decorate our school's annual spring bake sale. When the sale was over, the kids were "fighting" over who would get a flower. Pretty amazing. Thanks for the reminder. Keep up the great work.
I need to make these for my daughter's 18th birthday next week - she would be so excited!
Kim
I made some of these for my daughter's 1st Birthday in November and loved them so much- they are still hanging in my windows 6 months later! Definitely time for some new ones... in different colours! I love the blog- keep passing on the fantastic ideas! I am new to your blog but SO HAPPY that I found it... Tina
8 sheets of tissue for a large pompon.
Post a Comment