Showing posts with label everydaytutorial. Show all posts

Let's Celebrate with DIY Giant Tissue Paper Flowers

Friday, 15 June 2018

diy giant tissue paper flowers | Creative Bag
Photo credits: photography by Janet Kwan Photography | craft beer by GoodLot Farmstead Brewing Co | hand lettering by Love Lettering on this oval tub | real flowers from Flower Treasures | shot in the Noodle Gallery (artwork by Laura Culic) | creative direction and DIY projects by Lorrie Everitt


Giant tissue paper flowers are one of those DIY projects that can be translated to fit almost any theme and colour scheme and when you group together a collection of tissue paper flowers they can make a huge impact. Use them to create photo backdrops at weddings, celebrations and pop up markets.

diy giant tissue paper flowers | Creative Bag

It really doesn't matter if your flowers look like a specific type of flower. Use our templates and diy instructions as a guideline. Tissue paper and sizzle are available in many different colours so go ahead and just have fun.

diy giant tissue paper flowers | Creative Bag


Here's the supplies we used to create our giant tissue paper flowers: tissue paper, sizzle, natural excelsior, twist ties, cardstock, scissors and our petal templates.


Let's make a "sunflower" (or a flower with pointed petals):

diy giant tissue paper flowers | Creative Bag

Cut the tissue paper petals using the sunflower template in the quantities indicated.

diy giant tissue paper flowers | Creative Bag

Scrunch the flat ends of the tissue paper to create the petal shapes.

diy giant tissue paper flowers | Creative Bag

We suggest cutting a piece of cardstock cut into a circular shape so that it can be use it as a base to form the flower and afterwards for hanging purposes.

Create the first layer of  your flower by gluing the petals to the cardstock as shown below ...

diy giant tissue paper flowers | Creative Bag

diy giant tissue paper flowers | Creative Bag

diy giant tissue paper flowers | Creative Bag

Once the first layer is complete repeat with the remaining larger petals to create a second layer ...

diy giant tissue paper flowers | Creative Bag

Now that you have the hang of it, add two more layers of petals using the smaller petals ...

diy giant tissue paper flowers | Creative Bag

Once the petals are all set, glue a scrunched up ball of sizzle to the centre of the flower.

diy giant tissue paper flowers | Creative Bag

You can also create flowers with a more rounded petal shape using our other flower petal templates.

diy giant tissue paper flowers | Creative Bag

Cut the number of petals as indicated on the template and then follow the general directions for scrunching the tissue into petals and gluing the petals onto a cardstock base ...

diy giant tissue paper flowers | Creative Bag

We added a few layers of contrasting tissue paper (circles that were scrunched to give them a little texture) and then added natural excelsior to the centre of this flower.

diy giant tissue paper flowers | Creative Bag


diy giant tissue paper flowers | Creative Bag

Giant flowers take up a lot of space and you will find that you do not have to make many of them if you are trying to create a large backdrop. Try to vary the size of the flowers a bit so that you will have some that are a little bit smaller to fill in the spaces between the flowers.

diy giant tissue paper flowers | Creative Bag


We'd love to see your giant tissue paper flowers and how you used them. Share your photos on Instagram at #creativebaginspire and tag us at @creativebagco.


diy giant tissue paper flowers | Creative Bag


Sweet packaging ideas for Easter using our macaron boxes

Tuesday, 27 March 2018

sweet packaging ideas using macaron boxes | Creative Bag

Our macaron boxes are a customer favourite all year round. Today we are going to share a couple of ideas for using our single window macaron favor boxes for Easter celebrations. 

sweet packaging ideas using macaron boxes | Creative Bag

These macarons are from Macaronz. The macarons were hand painted with whimsical designs for Easter and packaged in our single macaron favor boxes. Simply embellish these boxes with ribbons and gift tags if you want to use these as party favors.

sweet packaging ideas using macaron boxes | Creative Bag

We added ribbon "bunny ears" to the bunny macaron packaging for a whimsical touch.


sweet packaging ideas using macaron boxes | Creative Bag

You can also use these single macaron favor boxes to package many other sweets. Here they were used to package Easter treats on lollipop sticks. Continue reading and we'll show you how!

sweet packaging ideas using macaron boxes | Creative Bag

Use a hole punch with a long reach to punch a hole in the bottom flap of the box. 
Close the bottom of the box.
Slide the treat into the box from the top so that the lollipop stick come out the bottom.
Once the treat is inside you can close the top of the box.

sweet packaging ideas using macaron boxes | Creative Bag

Ribbon makes this packaging complete.


Don't forget we also carry candy bags that can be used to package these sweet holiday treats!!


sweet packaging ideas using macaron boxes | Creative Bag

holiday inspiration: create your own gift boxes

Monday, 4 December 2017


gift box packaging inspiration for holiday gift giving | creativebag.com

Holiday gift boxes are wonderful to receive and are so simple to personalize for everyone on your list. Don't over think how to make your gift boxes look beautiful. Use any of our gift boxes to package a collection of holiday gift items and embellish them with a few items like ribbon, gift tags and mini wreaths.

Here's how we were able to add a wreath to one of our gift boxes using ribbon:

gift box packaging inspiration for holiday gift giving | creativebag.com

Gather your supplies: gift box, mini wreath, ribbon and a gift tag*
* we used the "hugs, kisses & merry wishes" coaster as a gift tag
Step 1: Loop the ribbon around one side of the wreath as shown above. 
Step 2: Centre the wreath on the top of the box and wrap both ends of the ribbon around bottom of the box. 
Step 3: Pull one end of the ribbon up and around to loop around the wreath as shown in the centre photo.
Step 4: Keep the wreath and ribbon in place by tying a knot. Finish with a bow and trim the ribbon tails to complete. 
Step 5: Tuck a round coaster in the centre of the wreath to use as a gift tag. 
Note - You can use this same technique using a wreath and ribbon on square and rectangular gift boxes. 


With a little help from our sweet customers, here's some inspiration for what to put inside your holiday gift boxes ... 

 gift box packaging inspiration for holiday gift giving | creativebag.com

Emma's Sweets created these beautiful custom cookies using custom cookie cutters designed to match our Sweet Life Collection. We packaged a variety of Mary's beautiful cookies with a mini bottle of bubbly tied up with holiday ribbon in these gift boxes. Emma's Sweets creates custom cookies all year long but you'll need to order early because she books almost a year in advance! Interested in learing how how to decorate your own cookies? Mary shows you how - subscribe to Emma's Sweets YouTube channel .

gift box packaging inspiration for holiday gift giving | creativebag.com

Macaronz is located in downtown Brampton and is well known as the place to go for high tea and french macarons. We packaged two of Macaronz hot chocolate kits with a vintage spoon in one gift box. French macarons were tucked into a holiday themed mason jar in another gift box along with a gift certificate for high tea at Macaronz tucked under the sizzle. Check out Macaronz for custom products and corporate gifts.

gift box packaging inspiration for holiday gift giving | creativebag.com

If you have ever been in Liberty Village Toronto and found yourself following the wonderful smell of freshly baked gingerbread to Mad Batter Bakery then you already know that they are known for their decorated soft gingerbread cookies and old fashion sugar cookies. We filled these gift boxes with their holiday themed gingerbread cookies and mug huggers along with loose leaf tea packaged in a mini mason jar. In keeping with our bakery theme, we also added recipe cards featuring watercolour gingerbread cookie illustrations by Alicia's Infinity and an adorable gingerbread cookie pin designed by Penny Paper Co. Mad Batter Bakery creates custom cookies all year round and offers gluten-free options.

gift box packaging inspiration for holiday gift giving | creativebag.com

If you like to shop at local holiday maker markets then you might find this gift box inspiring. We filled a clear take out box with tiny cookies from Teeny Tiny Bakery and packaged them along with a mug from Makeology and a DIY wood ornament kit from Kiriki Press. Teeny Tiny Bakery is located in Toronto in the Junction area and creates the most adorable teeny tiny cookies that will just make you smile. Tiny Tiny Bakery will make custom cookies and will ship them out if you don't live in the area.

We'd love to see what you do with our gift boxes this holiday season whether you are a professional gift wrapper or not! Share your photos on Instagram and tag us @creativebagco and use hashtag #creativebaginspire. 

Special thanks to all of our friends for allowing us to use their products! Stay tuned this month for more holiday gift wrapping and entertaining ideas.


gift box packaging inspiration for holiday gift giving | creativebag.com


Wrapping Paper DIY idea - Jewellery Display Cones

Tuesday, 19 September 2017

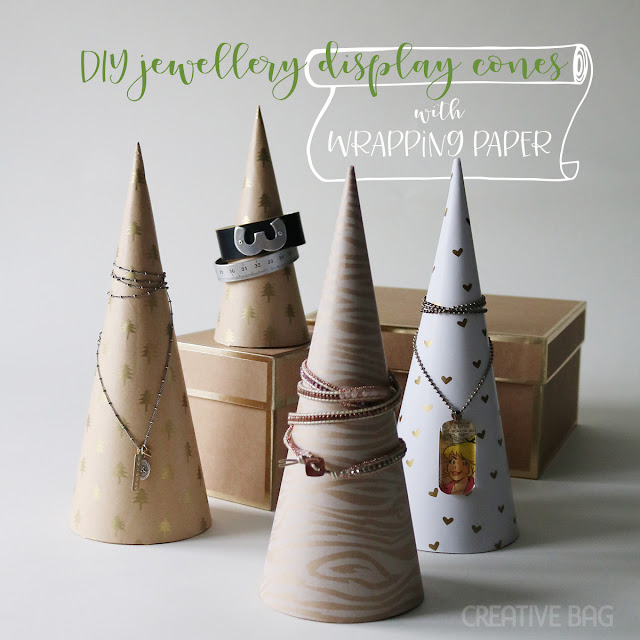
DIY jewellery display cones using wrapping paper | Creative Bag

Here's a simple DIY project using wrapping paper that is both beautiful and functional. If you make and sell handcrafted jewellery these display cones will come in handy for craft markets and to style your products for photography.

DIY jewellery display cones using wrapping paper | Creative Bag

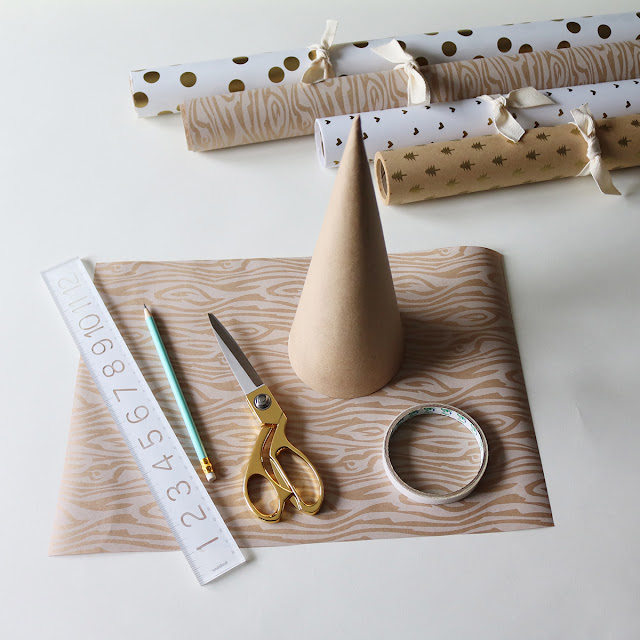
Here's what you'll need: 
Paper mache cones (available at most art supply stores), wrapping paper, scissors, two-sided tape, a ruler and a pencil.
Note: Wrapping paper patterns shown are from our holiday(tree farm, kraft wood grain) and everyday (gold hearts, white with gold dots) collections. 

DIY jewellery display cones using wrapping paper | Creative Bag

1. Cut wrapping paper to fit the cone as shown above making sure that there is enough length to fit completely around the cone. Add a piece of two sided tape along the cone as shown above.

DIY jewellery display cones using wrapping paper | Creative Bag

2. Place the cone with the two-sided tape down onto the centre back of the wrapping paper. Hold a pencil on the bottom of the cone. Roll the cone while holding the pencil in place to draw the curve of the cone onto the wrapping paper. Trim the paper along the curved line. 

DIY jewellery display cones using wrapping paper | Creative Bag

3. Roll the paper on one side around the cone. Trim the paper to fit as shown above and use two sided tape to keep the wrapping paper in place. Continue on the other side of the cone to finish.

DIY jewellery display cones using wrapping paper | Creative Bag

This is how the back of the cone should look when you are finished. If you want to change the wrapping paper at some point just remove the paper or cover it up and start all over again! Use assorted sizes of paper mache cones to give your display height or, if you have space, incorporate gift boxes into your display to give the cones more dimension. 

DIY jewellery display cones using wrapping paper | Creative Bag

Here's some more products that are great for displaying products in holiday markets and in styled shoots ... chalkboards, gift boxes, faux antler card holders, mini lights. 


For inspiration, here's how we used the DIY jewellery display cones in a holiday styled shoot recently with some local Etsy Makers:

DIY jewellery display cones using wrapping paper | jewellery by MarmaladeDesigns.ca

handcrafted jewellery by Marmalade | photo by Heidi Lau Photography | florals by Flowerly

DIY jewellery display cones using wrapping paper | jewellery by MarmaladeDesigns.ca

handcrafted jewellery by Marmalade | photo by Heidi Lau Photography | florals by Flowerly

DIY jewellery display cones using wrapping paper | jewellery by AliciasInfinity.ca

jewellery by Alicia's Infinity | photo by Heidi Lau Photography | florals by Flowerly


DIY favour inspiration using linen drawstring bags

Friday, 7 April 2017


diy favours using fabric bags | Creative Bag

Drawstring bags are a great option for favour packaging and they are available in many different sizes and fabrications. 

diy favours using fabric bags | Creative Bag

These linen bags are like blank canvases just waiting for you to make them your own. 

Here's nine DIY ideas to get you started:
diy favours using fabric bags | Creative Bag

One. Silk Flowers and Decorative Brads. This silk flower was pulled apart and put back together again using a decorative rhinestone brad. The brad was also used to attach the silk flower to the bag.

diy favours using fabric bags | Creative Bag

Two. Stamp and Paint. Stamp a design using permanent ink. I added a colour detail to this stamped image using a little paint and a puffy gloss sealer.

diy favours using fabric bags | Creative Bag

Three. Buttons. Use purchased buttons or pins. Make your own chalkboard button by spraying old buttons with chalkboard paint. Add hand lettered details using chalkboard markers.

diy favours using fabric bags | Creative Bag

Four. Glitter Paint. Add a heart using gold glitter paint. Use a stencil if you are making a lot of these.

diy favours using fabric bags | Creative Bag

Five. Rhinestone Buckles and Ribbon. Sew on the buckle and add a colour of pop with ribbon.

diy favours using fabric bags | Creative Bag

Six. Fabric Petals and Buttons. Layer different colours and textures of fabric for a bit of whimsy.

diy favours using fabric bags | Creative Bag

Seven. Hand Lettering and a Resin Pin. Use a fine tip permanent marker to hand letter words or a name. The resin flower pin and felt leaf were added for a pop of colour.

diy favours using fabric bags | Creative Bag

Eight. Iron On Transfer. Create your own or search Pinterest for designs to download and use as art for iron on transfers. 

diy favours using fabric bags | Creative Bag

Nine. Dye and Buttons. Use food colouring and water to create your own fabric dye. Create an ombre look on the bags by adding more dye to achieve the look. Sew on a button to hold a gift tag.

diy favours using fabric bags | Creative Bag

Feeling inspired? Hope so! If you make any of these share them with us on Instagram using hashtag #creativebaginspire and don't forget to follow us @creativebagco.