As promised at the mini workshop on the weekend ... here's the instructions for how to recreate your own paper flower favor kits so that you can mass produce these for a wedding or party. Just remember whatever colours of papers and materials you use will make these uniquely your own.
I created this template of the different shapes you will need to cut out for this project. You will see that I indicated what tool I used to cut each shape. You can download the template here.
Please note: that if you are just interested in making a few of these, you can use my template as a guide to trace and cut the shapes by hand. If you are planning on making a lot of these I would highly recommend purchasing the tools.
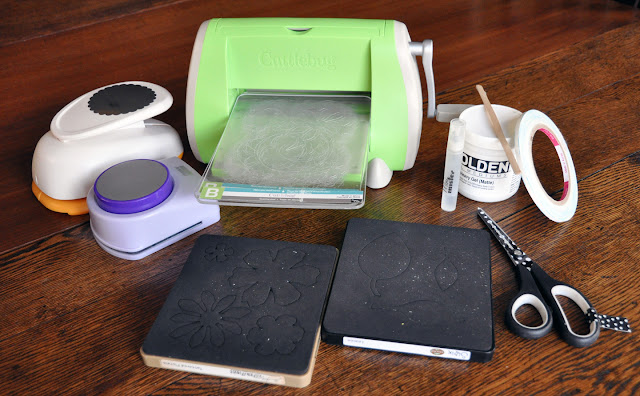
Here's my list of tools to make and assemble your own paper flower kits:
1. Cuttlebug die cutting machine*
2. Sizzle Bigz die - Tim Holtz Alterations "tattered florals"*
3. Sizzle Bigz die - Eillen Hull "leaves"
4. circle paper punch - 3" diameter
5. scallop circle punch - 3.5" diameter
6. small water mister
7. Golden Gel Medium "heavy matte" - or you can use white glue or a hot glue gun
8. two-sided tape
9. scissors
We have just received some of these tools in the Toronto store this week. The Cuttlebug retails for $89.99 and the Sizzle Bigz dies are $19.99 each. They are in the Creative Studio space if you are looking for them. We did not order large quantities so if we are sold out of something that you were looking for let us know and we will special order more.
The other materials that you will need to create these favor boxes are:
1. small mod boxes - I used the kraft coloured boxes. There are many colours options to select from that are stocked in the stores or can be special ordered.
2. diamond wrap - I used silver (the new shipment of silver just arrived!!). Use whatever colour works for your wedding or event. You will need to cut the diamond wrap into 11.5" lengths. From each 11.5" length you will cut 6 strips (four rows of diamonds high) to fit the small mod box lid.
3. tulle - I used white, but again there are lots of colour options (some with glitter!) so select what works best for you. I cut two small 1.5" square pieces of tulle for each favor box so you will have lots left over for other projects and decorations.
4. scrapbooking papers and old books - use what works for you. Pages from old books work well for a vintage theme. When you are selecting coloured papers, I recommend buying two sided papers for the flowers. The easiest way to co-ordinate colours if you are doing more than two colours is to purchase a pad of paper because the colours will already be co-ordinated for you and eliminate a lot of guess work.
Here is a quick tutorial for how to use the cuttlebug die cutting machine with the Sizzle Bigz dies. I demonstrated how to do this at the paper flower mini workshop so this will be a reminder for some of you. You will need a large metal die and the two "B" plates that came with your Cuttlebug.
1. Cut your paper to either fit the size of the metal die (if you want to cut all of the shapes on the die) or to fit the size of the shape you wish to cut (plus a little extra in case the paper moves slightly when you are cutting).
2. Open the Cuttlebug as shown and place the first "B" plate on one side of the machine as in the picture. I am right handed so I positioned the Cuttlebug so that the handle is on the right side.
3. Now place your die on top of the "B" plate with the black foam side facing up. Put the paper on top of the shape(s) to be cut from the die.
4. Complete your "sandwich" by placing the second "B" plate on top of the paper. And now you are ready to cut.
5. Place your left hand on top of the Cuttlebug as shown and use your right hand to turn the handle and continue to turn the handle until the "sandwich" passes completely through the machine to the opposite side.
6. Take the "sandwich" apart and remove your die cut shape and the excess paper.
Depending on how thick your paper is, you can more than one piece of paper at a time. I've used two or three pieces of regular weight scrapbooking paper when I have many pieces to cut and it saves a lot of time.
These steel rule dies can cut shapes from many different kinds of materials. Use them to cut cardstock, chipboard and matboard, craft metal, craft plastic, fabric, felt, flexible magnet, poly foam, shrink plastic, vellum and vinyl. I love to cut fabric shapes using my Cuttlebug and I just found out that they have dies for quilt making ... wow, I wish we had that 20 years ago when I was making baby quilts for everyone!!
The number of different dies to cut out seems to be limitless. At last weekend's workshop, I showed another flower die (that just arrived in the Toronto store this week) that can be used on the Cuttlebug and you can view a quick tutorial on my personal blog to make that flower by clicking here.
So now you know how I created my paper flower favor and you can recreate lots of them yourself if you want to. Just remember you can easily make them your own design by using whatever colours you want.
I hope that you are having a creative day!


⋅1 comment
Totally cute!
www.littlemisshandmade.blogspot.com
Post a Comment