Showing posts with label paper lanterns. Show all posts

gender neutral {birds and bees} baby shower inspiration

Thursday, 25 February 2016


birds and bees gender neutral baby shower | Creative Bag

If you are in our Toronto store in the next few weeks check out this fun gender neutral baby shower display that I put together with some help from Tanya of Save the Date Events and Doris from Love Lettering.

birds and bees gender neutral baby shower | Creative Bag

I took photos of all of our baby shower party ideas before setting up the display so I could share them with you here on the blog. Our colour palette was pool blue, pea shoot green, white and a touch of yellow. 


birds and bees gender neutral baby shower | Creative Bag

As you can see from the party favours, food and decor elements, our shower theme is "the birds and the bees". 

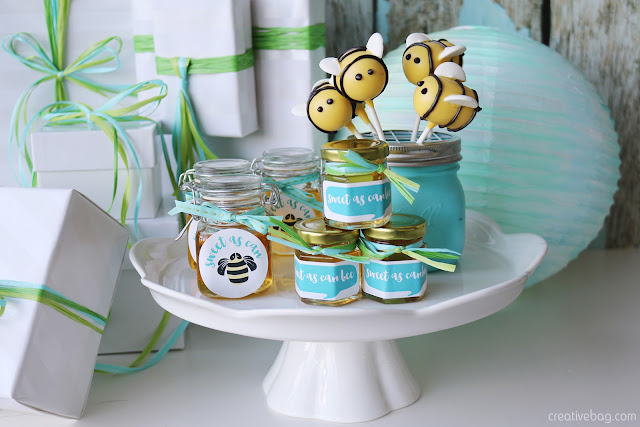
The sweet bee and blue bird cakepops were made by Save the Date Events. I painted some mason jars in blue and green and used them to display the cakepops. To keep the cakepops in place, I used a wire grid lid and added a cup of sugar to the bottom of the mason jar.

birds and bees gender neutral baby shower | Creative Bag

We recently installed some new equipment in our Toronto office so we can print custom labels. I tested a number of different label shapes with custom designs for the shower favours. We'll be offering custom label services soon, stay tuned for more details.

I created a few different party favours for the store display. A couple of our glass containers were filled with honey and decorated with custom labels, ribbon and wraphia. Our new white bird cages were filled with egg shaped candies and decorated with striped ribbon. Sunflower seeds were added to clear tubes and decorated with custom labels, washi tape and wraphia.

birds and bees gender neutral baby shower | Creative Bag

White set up boxes and boxes wrapped with white tonal striped wrapping paper were decorated with three different colours of wraphia and then used as decorations for the party.

Let guests know where to sit for lunch using our cute little nests with filled with a single hand lettered egg. The eggs for our baby shower display were decorated by the very talented hand lettering artist Doris from Love Lettering. 
birds and bees gender neutral baby shower | Creative Bag

I always like to use our white cake stands to display sweet treats. Get creative by preparing custom drinks in our glass bottles and set them up beside a container filled with paper straws in blue and green.

birds and bees gender neutral baby shower | Creative Bag

Paper lanterns and bunting made from tissue paper tassels shout "let's party". It's easy to decorate a large balloon with DIY tissue paper tassels and you can use it as a photo prop during the shower. We are waiting for a couple of lines of large balloons to come into the stores and I'll let you know when they arrive on Instagram.
birds and bees gender neutral baby shower | Creative Bag

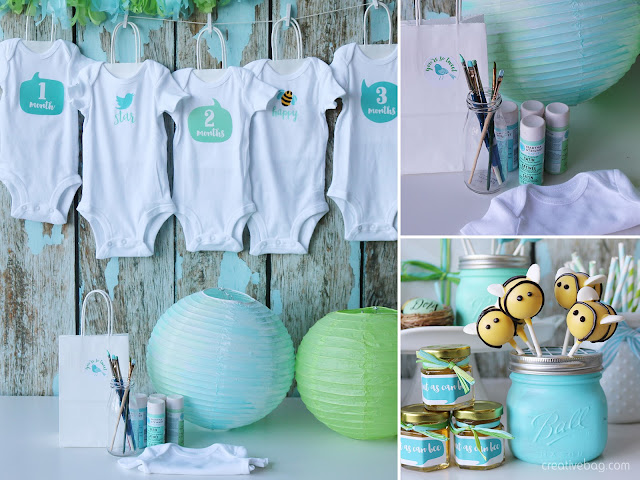
I painted one of our white paper lanterns with the same acrylic craft paint that I used to decorate the mason jars. I added a little bit of water to the paint so it would have a "watercolour" effect on the paper lantern.

Here's a cute idea for a baby shower party activity - have every guest paint a onesie. Any acrylic craft paint can be made into a fabric paint by simply adding Martha Stewart's tintable fabric medium. Have guests paint the onesies using our small paper shopping bags to keep the paint from going through the fabric. Then hang the onesies up to dry on baker's twine using the bags as hangers with mini clothespins. 

birds and bees gender neutral baby shower | Creative Bag

Last year I created a download for "baby photo stickers". I reworked the art to co-ordinate with the colours of this gender neutral shower and you can download them here. 

birds and bees gender neutral baby shower | Creative Bag

You will need to use blank stickers to print the monthly photo stickers from my download. I used a 4x4x1 stationery box to package the photo sticker and an 8x8x6 set up box to package some onesies along with the photo stickers. The download contains two different options for the memory box lid - one is as shown with the "welcome baby" message and the other has no words so you can personalize it yourself with the baby's name and birth information. You can find all of my directions for this DIY project in this post. 

birds and bees gender neutral baby shower | Creative Bag

Thanks again to Tanya and Doris for collaborating on this display with me. 

I'm going to end with a picture of this sweet hand lettered baby's sleeping chalkboard sign that Doris sells in her Etsy shop. 


Creative Pinspiration to do with the kids (vol 2)

Monday, 24 August 2015

creative pinspiration to do with the kids

In my last post I gave you some project ideas that you can do with the kids using our everyday products and inspiration from our Pinterest boards. Here's a few more ideas to inspire you using paper lanterns, clothespins, ribbon, baker's twine, lace and iron on transfers.

Paper lanterns are not just for weddings and parties, let the kids decorate their bedrooms with paper lanterns that they have decorated with paint, tissue paper, decorative paper napkins or fabric pieces.

Clothespins are available in a variety of different sizes and colours. Let the kids decorate inexpensive clothespins with paint, markers, glitter tape and more. Embellished clothespins on paper bags are a wonderful idea for a child's birthday party favor.


creative pinspiration to do with the kids


Make an entrance with a ribbon curtain on a door. This project takes me back to a time when I was a teenager and I begged my Mom to take the door off my bedroom closet so I could hang a funky beaded curtain in it's place.

A great way to use up ribbon and lace scraps is to create these adorable heart shaped sun catchers.

Baker's twine can be braided or used with leather and felt scraps to create funky bracelets.

String art can be created using any kind of string but I think that baker's twine would give this 1960's craft technique a modern twist. This is a great string art idea for the kids - spell out their names on long pieces of wood and hang the finished art in their bedrooms.


What little girl doesn't dream of being a princess? Make princess crowns using crochet lace ribbon or lace ribbon and fabric stiffener. You can add metallic paint, glitter and rhinestones afterwards if you want the crowns to sparkle.

Older fashionistas might like to decorate their denim shorts with lace or crochet lace ribbon. Sew the lace ribbon on by hand or give older kids a lesson on how to use the sewing machine with this basic sewing project.

Use iron on transfers on scraps of fabric or napkins and frame them in embroidery hoops. You can teach older children a few basic embroidery stitches and create a unique piece of art. Younger children can embellish the iron on transfer design using fabric markers and glitter glue instead of using needles and thread!

October is not that far away and if your child is into superhero these tee shirts are a fun idea for now and they can be reused later for Halloween! The project pin will take you to a website with the artwork for the superhero icons to use with our iron on transfers.

Note: Iron on transfers require adult supervision during the ironing stage.

lace crowns, fashionista shorts, embroidery hoop art, superhero tees

I hope that you have enjoyed the 

Find many more creative ideas using our products on our Pinterest boards.

Have a great week!


Wedding decorations for your ceremony and reception ... be inspired by our Pinterest boards

Wednesday, 7 August 2013


Pinspiration for weddings, showers and parties!


Creative Bag's Pinspiration ideas - be inspired on Pinterest and find it at creativebag.com
 Tissue paper flower pompom kits. We have lots of colour options. Just in case you didn't know, we also sell tissue paper in bulk so if you are planning on making a lot of these you may want to check it out as an option.

Creative Bag's Pinspiration ideas - be inspired on Pinterest and find it at creativebag.com
 Paper lanterns are available in three different sizes and lots of colour options. Use them on their own or combine them with other hanging elements to create your own look.

Creative Bag's Pinspiration ideas - be inspired on Pinterest and find it at creativebag.com
 Rose petals have always been a popular item. A new shipment has arrived with lots of new colours and at $.99 for a package of 100 these will continue to be a great choice.

Creative Bag's Pinspiration ideas - be inspired on Pinterest and find it at creativebag.com
 Keep it simple or get creative with tulle in classic white or one of our many different colours.

Creative Bag's Pinspiration ideas - be inspired on Pinterest and find it at creativebag.com
Planning a vintage or rustic theme? Burlap is a natural choice and we have lots of burlap products to make your day special. 
Creative Bag's Pinspiration ideas - be inspired on Pinterest and find it at creativebag.com

Looking for more Pinspiration? Follow us on Pinterest!

Creative Bag's Pinspiration ideas - be inspired on Pinterest and find it at creativebag.com

Looking for my tutorials on how to make tissue paper flower pompoms or tulle pom poms? Check out my tutorials on the blog.


DIY Halloween Jack-o'{paper}-lantern

Wednesday, 17 October 2012


I really wanted to decorate a paper lantern to look like Halloween jack-o'-lantern but realized that we don't carry orange paper lanterns. At first I was disappointed and thought that I would just have to come up with another idea. I started looking at the tissue paper pompom kits and it occurred to me that I could use a package of our orange coloured tissue paper to cover a white paper lantern. And so my jack-o'{paper}-lantern project was on!
So here's what I did:
I used a medium sized paper lantern and one package of tissue paper. I cut the tissue paper into 2" wide strips.
My adhesive of choice was gel medium (modge podge or white glue will also work) and I used a foam brush to adhere the 2" tissue paper strips to the paper lantern. As you can see in the photo above, I adhered the tissue paper strips from top to bottom and worked my way around the lantern.
I found it easiest to apply the gel medium directly onto the paper lantern first and then carefully add the tissue paper using the foam brush to make sure that the tissue lays flat. Once each tissue paper strip is in place use the foam brush to apply a top coat of gel medium to the tissue paper.
Tip: I covered one half of the lantern one evening, hung it up to dry and then finished the second half the next morning.
To add the eyes and mouth to create a jack-o'-lantern I used black paint and painted directly on the dry paper lantern. You could use black paper shapes if you don't want to paint and attach the paper with gel medium or tape.
If you are looking for paper lanterns for a wedding or party and cannot find the perfect colours to match your decor -  keep in mind that you can easily change the colour using white paper lanterns, coloured tissue paper and some gel medium.
After making these Halloween paper lanterns, I started thinking about other ways to decorate our paper lanterns. Look for more paper lantern decorating ideas for theme parties to come!!!
Are you still busy working on last minute details for a Halloween party? Then this is a great time to visit our Creative Bag stores! All of our Halloween themed products have been reduced to 50% off! Hurry into any of our three retail locations before everything disappears.