cotton candy favor inspiration

Monday 25 May 2015

cotton candy favor packaging | Creative Bag

Who doesn't like cotton candy? Sugar spun into happy little clouds from Candyland. I was given some (yummy) organic cotton candy to sample from Janelle of Lola's Cloud a couple of weeks ago and now I keep seeing cotton candy everywhere I look.

Sweetapolita baking book - sweet inspiration!

I even saw cotton candy used a couple of times in this incredible baking book by Rosie Alyea. Rosie is the creative blogger/baker at sweetapolita.com. If you have not visited Sweetapolia's blog before you have to check it out - it's sooooo inspiring. 

cotton candy cloud cookies

Check out Rosie's pink cotton candy cloud cookies! They are on my list to make with my daughter this summer during school break. I also want to make her chalkboard inspired cakes and cookies ... including the edible chalk! You've most likely seen some of Rosie's layered cakes on Pinterest - they are the ones with all of the different colours of cake inside! So much fun. This book has so many great ideas and inspiration if you are planning a party or special event. 

cotton candy favor packaging | Creative Bag

If you are thinking about having cotton candy favors, here's some inspiration using our bakery and candy packaging supplies.

This first favor was created using clear containers with dome lids. This size is great for cupcakes but cotton candy looks great in these as well. The top of the dome has a flat space that allows you to add a round sticker to customize your favor. You can personalize these a little more by tying a ribbon to match your decor/theme around the middle section. 

cotton candy favor packaging | Creative Bag

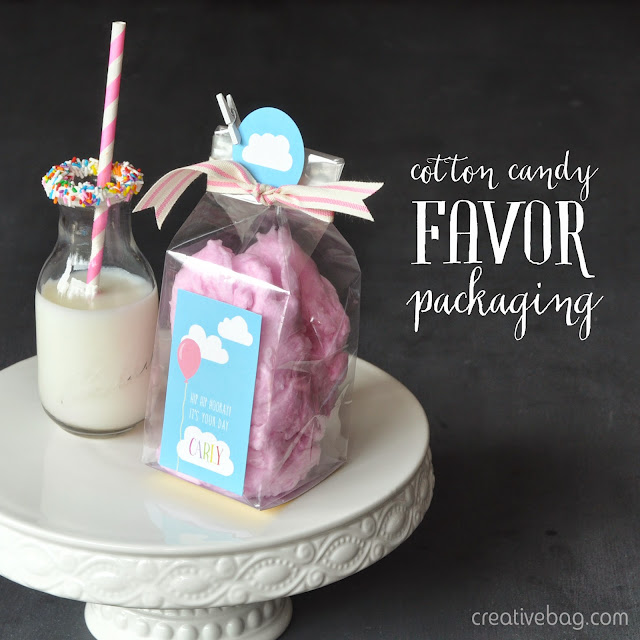
Our new econo hard bottom candy bags are great for creating cotton candy favors or packaging cotton candy for a sweet table. They come in a number of different sizes and you can easily cut the top of the bag if they are too long.

cotton candy favor packaging | Creative Bag

The top of the bag on this favor was folded over a couple of times and I used two sided tape to seal the bag to keep the cotton candy fresh. Ribbon was added to hide the two sided tape and give a finished look to the top of the bag. A custom sticker was added to the front of the bag and a gift tag was clipped to the top of the bag using a small clothespin

cotton candy favor packaging | Creative Bag

Cotton candy on a paper straw was inserted into this candy bag for a party favor. A twist tie keeps the bag closed and a piece of ribbon hides the twist tie. I added a custom gift tag to the bag using baker's twine. This bag is not completely sealed because of the paper straw so this favor would be best to create close to the date of the party.

Planning a party? We have lots of great new products to help you celebrate arriving weekly.


good things come in pretty "kraft" packaging and another free printable

Wednesday 20 May 2015


good things come in pretty packaging | Creative Bag

Kraft boxes are one of my favourite things to keep on hand for last minute packaging projects ... 

good things come in pretty packaging | Creative Bag

... add some ribbon(s), our free printable gift tags and these diy tissue paper gift toppers and you are ready to go!

two piece kraft and white gift boxes | Creative Bag

Our two piece kraft and white boxes take the standard kraft box to a whole new level and are available in three sizes.  

good things come in pretty packaging | Creative Bag

The smallest box is ideal for wedding and party favors. It is 4" x 4" square and 4.5" high. I added white lace ribbon, a green striped ribbon and pink dot ribbon to the bottom half of this box. A tissue paper flower was slipped in between the ribbons.The box can be opened without removing the ribbon and tissue paper flower. Find lots of flower making tutorials using tissue paper on this Pinterest board. If you print the gift tags as stickers they can be added to the box as shown above.

good things come in pretty packaging | Creative Bag

The medium sized box measures 6" by 6" and is 4.5" high. This time I wrapped the ribbons across the top of the box to keep the box "sealed". Blue and green tissue paper were combined to make the tissue paper tassel gift topper. Find my tutorials for making tissue paper tassels here. To make the gift tag stand up - I added a small tab on the bottom back of the gift tag and inserted the tab between the ribbons.

good things come in pretty packaging | Creative Bag

The largest box measures 8" x 8" and is 4.5" high. This time I added a small tissue paper pom pom made to look like a flower by combining different colours of tissue paper. You will find my tutorial for making tissue paper flower pom poms here

We've just added some new pre-cut tissue paper pom poms to the website.

good things come in pretty packaging and a free download for gift tags | Creative Bag


diy confetti poppers and make your own confetti

Thursday 14 May 2015


diy confetti poppers and make your own confetti | Creative Bag

As the weather continues to get warmer, it seems like everyone is planning a celebration of some kind. I've talked to so many customers in our stores these past two weeks looking for ideas for weddings, bridal showers, anniversaries, baby showers and birthdays. 

So today let's celebrate with some diy confetti poppers that you can create using our push pop containers , my free printables and confetti!

diy confetti poppers and make your own confetti | Creative Bag

Let's gather our supplies: push pop containers, spray paint (in colour of your choice), confetti (I'll show you how to make your own in a minute!), download and print the labels. I printed my labels on blank sticker sheets - you could also print on white text paper and use two-sided tape to adhere them to the push pop containers.

diy confetti poppers and make your own confetti | Creative Bag

Note: You don't have to spray paint the push pop containers - this step is optional. 

Spray paint the stick and inside element of the push pop container to add a pop of colour but keep in mind that if you paint the push pop containers you will not want to reuse these containers for food.  

It will take a number of coats paint to completely cover the plastic - take your time so that you don't get any drips and allow the paint to dry COMPLETELY between coats. 

Tip: Allow paint to cure for 24 hours before assembling the push pop containers.

diy confetti poppers and make your own confetti | Creative Bag
  
Assemble the push pop container pieces and add the label as shown above. 

TIP: If you want to use these confetti poppers for a baby "gender reveal" party or photo shoot, I'd suggest adding black and white patterned washi tape above and below the label and spray paint the push pop container top to hide the colour of the confetti inside.

diy confetti poppers and make your own confetti | Creative Bag

Now it's time to add the confetti. Push the confetti down into the container so that you can easily add the lid.

diy confetti poppers and make your own confetti | Creative Bag

Give the container a shake so that the confetti will expand into the open space under the lid.

You can buy premade confetti if you want, but it's really easy to make your own and I'm going to show you how I made mine.

diy confetti poppers and make your own confetti | Creative Bag

When you make your own confetti you have the ability to customize it to suit your party. White and gold confetti would be great for a wedding. Having a baby? Use pink or blue confetti for a gender reveal party or photo shoot. The options are endless.

diy confetti poppers and make your own confetti | Creative Bag

Gather your supplies - tissue paper, paper sizzle, mylar sizzle, paper, scissors, fringe scissors, paper punch.


I used fringe scissors to cut tissue paper into confetti quickly and easily. Simply fold the tissue paper so you can cut four layers at a time. Cut the bottom edge with the fringe scissors and then cut the fringes again to create little squares. Don't have fringe cutters? Use regular scissors ... it just takes a little longer to cut!

diy confetti poppers and make your own confetti | Creative Bag

Our paper and mylar sizzle makes awesome confetti. And best of all - no special tools are required - just a pair of scissors. Bunch the sizzle into long strands and cut it into smaller pieces. 
  
diy confetti poppers and make your own confetti | Creative Bag

You can create confetti using small paper punches and paper scraps. I don't recommend this method if you are making a lot of confetti. It's time consuming and your hand will get tired of punching large quantities. I used a paper punch with hand grips and still found it difficult to punch for long periods of time.

Tip: I wanted to add a little extra sparkle to my confetti so I cut up some old mylar gift toppers that I had in my gift wrapping stash and a handful of sequins.

diy confetti poppers and make your own confetti | Creative Bag


Celebrate good times ... with a little help from Creative Bag!


Happy Mother's Day!

Friday 8 May 2015

http://www.creativebag.com/labels-tags/blackboard-signs/tin-blackboard-on-stick

It's Mother's Day this weekend. You already know we've got lots of pretty packaging supplies to wrap up a special gift for Mom but did you also know that our stores carry a great selection of unique products for celebrations and parties?

Take for example our new tin chalkboards on a stick. I added one to a cake to create a custom cake topper for Mom! Simply add a message or word using a chalk marker or chalk and you are done! These chalkboards would also be adorable in a bouquet of flowers or a potted plant. 

Looking for more chalkboard product ... find them here.

Cake toppers for parties and weddings ... find them here and here.


* * * * * * * * * * * * * * * * * * * * * * * * *

And to all of our wonderful Moms ... we thank you, we remember you and we love you.