Showing posts with label cards and tags. Show all posts

Lorrie Everitt's simple ideas to making Christmas gift wrapping extra special this year.

Sunday, 16 December 2012

Today I  am going to share with you some simple ideas that will make make your Christmas gift wrapping look extra special this year.
1. Use Christmas ornaments to as a decorative element in your gift wrapping. This is so much easier than trying to tie big elaborate bows and after the gift has been opened the ornament can be hung on the Christmas tree. This is a great tradition to start with young children, family and friends.  I especially love ornaments that you can add a picture. Visit our stores for holiday ornaments ... they won't last long so visit soon.
2. Spend a little extra time gift wrapping gift cards. Think outside of the box or should I say the standard envelope that comes with most gift cards. We have lots of  tin containers, card holders and bags that will can be used with gift cards. Dress them up with stickers, ribbons and other decorative elements to make them extra special this holiday season. You can find my free downloads for the tin gift card holders in this post here
3. Keep some holiday themed pipe cleaners on hand to use in your gift wrapping. Twist the pipe cleaners into letters and use them as gift tags or decorative ornaments.  Bend them into candy cane shapes or Dr. Seuss like swirls to use as accents. I used small left over pieces of paper straws from my paper straw wreathe project  and pipe cleaners to create snowflake ornaments. We still have pipe cleaners in our stores but they won't last for long! 
4. If you have ever been to one of my Creative Evening workshops you know that I love using clothespins to attach decorative elements and gift tags to bags and boxes. You can  paint clothespins, decorated them with glitter tape or leave them natural. I use E-6000 glue to attach small  decorative elements to clothespins. We have assorted sizes of clothespins in our stores. E-6000 glue and glitter tape are available in the Creative Studio  space at the Toronto store only.

5. This is my favourite gift wrapping suggestion and one that I have used for 
the past few years. I use photos of my daughters and cut them into different shapes to use as gift tags. I  use one picture for each person and print copies that I can easily cut  out with paper punches or scissors. We have a few paper punches at the Toronto store in the Creative Studio space - I'm using the one that looks like a gift tag shape this year!

{diy} stationery inspiration using our stationery kits

Saturday, 14 July 2012

Are you planning to make your own wedding or party stationery? If you are ... we have lots of diy stationery kits in our stores and online.
We stock these items in the wedding section but I want to show you that the papers in these kits can be used for more than just wedding invitations. It is very easy to customize these papers using your printer, some embellishments and your imagination.
Here's how I created the samples shown above using my home computer & printer:
 ADDING YOUR TEXT 
On my computer, I prepare all of my type in a document that is sized to fit the stationery paper I will be printing on. I work in Photoshop and Illustrator but you can do this in the software of your choice.
Tip: To make sure that all of your type is set to fit within the blank space of the invitation, set your margins and leave 1/2" of white space between the stationery design and your text.
Once I am happy with my text, I save the art and open a new 8.5" x 11" document. I paste my saved art to the new document and position the art so that it will fit in the top left corner. I do that so that I can easily line up the invitation papers.
PRINTING
1. Test print your letter size document on regular bond paper. Tip: do not allow your computer to resize or centre your image. You need to print as is (size and position).
2. Then I use a light source to make sure that I am happy with the invitation set up and positioning of the text. You should be able to see through the papers and get a good idea of final placement ... see #2 above. If you don't like what you see ... go back to the computer and modify your text. If you are good to go, add a few small pieces of masking tape (or painter's tape) to the edge of the stationery to hold it in place against the bond paper for printing.
3. Manually feed the combined papers through your printer. Carefully remove the tape from the invitation so that you do not tear the paper and admire your work!! You can continue to print more invitations using the same bond paper.
Keep in mind that the font(s) that you use and the colour of the font(s) will set the tone for your event. We have stationery designs that are very elaborate like the letterpress sample shown above in pink and brown but we also carry designs that are less ornate and can be customized to fit many different themes.

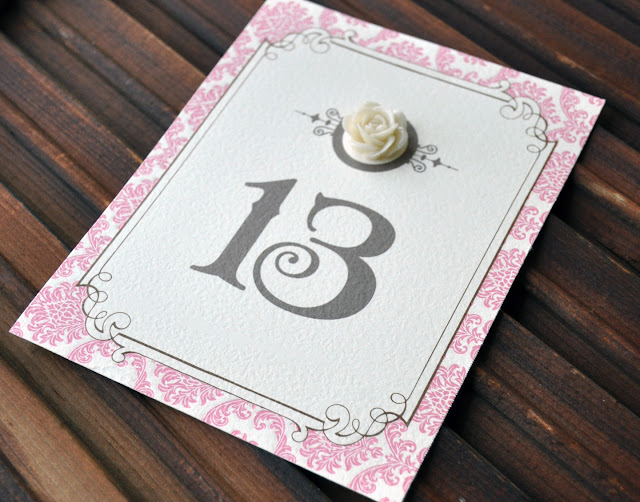
You can customize your stationery using embellishments. Our new resin flowers are perfect for wedding stationery. They are available in three different sizes and lot of colours. In the sample above I knew that I would be adding the resin to the top of the stationery so I positioned the text with that in mind.

Tip: I used Inkssentials Glossy Accents (available in the Toronto store's Creative Studio space) to adhere the resin flowers to the paper and know that it works well. I would suggest that you test whatever glue you want to use to make sure that the resin bonds smoothly to the paper before you do too many invitations.


So here is the same stationery kit paper but this time I used it to create menus. Who said that stationery kits had to be used for just invitations? And because this would not be sent in the mail, I used one of our large resin flowers to decorate this piece.

Everyone knows that the smaller cards in the stationery kit can be used as reply cards ... but that is not the only thing that they can be used for! How about creating your own "save the dates" as I did!! A small resin flower was added to this sample.


To create table numbers, I would use either the large or the small (as seen above) stationery. In my sample above, I designed the art so that a small resin flower could be positioned on top ... which is a good idea if you have someone helping you to assemble a lot of these because they will know exactly where to place the embellishment. 


The sample above was created for a birthday party. It was embellished using a resin flower and satin ribbon. I was able to add the ribbon by using a tool called Sew Ribbon. I will share other projects using this handy tool in my next post. You can view a tutorial for using this tool from We R Memory Keepers here ...

We sell the Sew Ribbon Tool in the Creative Studio at the Toronto store.


We have lots of simple "thank you" cards that can be embellished with ribbons, resin flowers and rhinestone buckles.


Here's one last project that I wanted to share with you. This time I created a little home decor item using the letterpress stationery. I knew that I wanted to add a resin flower to this piece, so after printing the quote, I used two sided tape to adhere the paper to the glass of a picture frame.

Lauren & Adam's wedding {project} no. 4

Sunday, 24 June 2012


Lauren and Adam's Wedding is a week away and I wanted to share with you another project that we worked on with Lauren for the reception ... their escort cards.

We started with mini kraft paper bags and plain white tags (both are currently available in our Toronto store). We wanted to address the envelopes with the guest's name(s) and the tag inside the envelope would reveal the table number. Lauren did not feel comfortable writing on her envelopes so the first thing we tried was to print on the envelopes using our ink jet printers. But to be honest, we did not have much success and I would not recommend trying it. Lauren suggested that we try using sticker labels to address the envelopes. And that is what we did! I created a simple digital template with a lace design for her and Lauren added the names to each sticker. Then she printed the labels using the StickerYou custom stickers.

To make the tags a little more vintage looking, we die cut the tags using a "deep edge" Martha Stewart paper edge punch. Then I used distress inks to "colour" the tags so that they would look like old paper. The numbers on the tags were stamped using a vintage looking font.
Here's a quick breakdown of the tools that I used and how I recommend using them.
Note: all of these tools and supplies are available in our Toronto store in the Creative Studio area.
The Martha Stewart paper punch design that is shown is called "embroidery". Tip to use this punch with paper tags: reverse the punch so you can see where the die is going to punch the paper if you want the design to be centred.
I used Tim Holtz's distress inks in "vintage photo" and "walnut stain". I always use my Inkssentials craft mat and the Inkssentials bleeding tool when I use distress inks.
I prefer to use stamps on clear blocks so that I can see exactly where I am stamping.

If you want to learn more about using distress inks ... I'm going to suggest that you check out this video from Tim Holtz. Keep in mind when you watch the video that I used the blending tool technique on the tags  ...


Whether you are creating escort/place cards for a wedding, party or event you can make these your own by using different colours of ribbon or distress ink on the tags, using a different paper edge punch (how about a snowflake design for a winter wedding?), change the stamp font (look for something more whimsical for a child's party) or try using your own handwriting on the envelopes (for a personal touch).  

We have lots of escort/place cards in our stores and online that you can customize or use "as is". Stop by and see our selection.

Lauren & Adam's wedding {project} no. 3

Wednesday, 13 June 2012

Lauren and Adam's wedding is just a few weeks away and I thought that I'd share with you another project that we worked on for the wedding reception ... their table numbers.

Lauren's vision for her vintage inspired wedding was to keep the colour palette neutral and try to mix lots of different textures. We really wanted to use burlap somewhere on the tables and the table numbers seemed like a natural choice. Lauren found these great vintage looking frames in three different sizes at Ikea and they all looked great with the burlap inside. We couldn't decide which frames we liked best and ended up selecting two different shapes because Lauren and Adam are going to have a mix of two different shapes of tables at the reception.

So here's how we put these together ...
Supplies: I designed clear number stickers and had them printed online at Sticker You. Sticker You has fonts that will allow you to design your own numbers online. I also used burlap ribbon, kraft cardstock (which we now sell in the Toronto store in the wedding section), frames with glass (ours were from Ikea) and a bone folder (which we have in the Creative Studio at the Toronto store).
1. I cut the burlap and kraft cardstock to fit the inside of the frames (our frames were 5"x7"). The burlap was inserted so that it was directly behind the glass and the kraft cardstock was behind the burlap. Then I added the frame back.
2. The clear number stickers were applied to the outside of the glass. Carefully centre the sticker in the middle of the glass and when you are happy with the position you can use a bone folder to make sure that there are no large air bubbles under the sticker. It's that easy. 


Valentine inspiration - marshmallow pop treats and gift cards using my free downloads

Wednesday, 8 February 2012

Valentine's day is next week and I thought I'd share a couple of more ideas if you are planning a Valentine celebration.

I've pinned a few of these marshmallow pop treats on my pinterest boards and I thought that it would be cool to try to make these with my daughters. They are so easy to make and you can use different colours of marshmallows, chocolate and sprinkle to customize these for any occasion or party theme.

To display these sweet treats on a lollipop stick I simply placed them in one of our glass cube vases that I filled with candy. {yum}

So here's how I made our Valentine marshmallow pop treats:
You will need some lollipop sticks, marshmallows, chocolate candy waffers and sprinkles (we used mini hearts in red, pink and white).
First you will need to insert the lollipop sticks into the marshmallows and set aside.
Melt the chocolate candy waffers as per the directions on the bag.
Carefully dip the marshmallow tops into the melted chocolate so that you cover about 1/2 of the marshmallow.
Add the decorative sprinkles to the chocolate candy coating while it is still warm.

Tip for the candy display in the glass vase: If you are making a lot of these marshmallow treats and you are using a large glass vase for presentation purposes I suggest that you bury a piece of styrofoam wrapped in wax paper into the vase and completely cover it with candies. This will save you from having to purchase a lot of candy and the styrofoam is an excellent material to keep the lollipop sticks in place.

Here's another cute idea for Valentine's day that was created by one of our customers!
Ivanka Lentle posted this project on her blog at ivankascardstudio.blogspot.com. Ivanka used my valentine flag download as an element on the gift tag of a Valentine themed loot bag. The clear candy bags are from our candy bag collection.

And here's a Valentine card that I created using some scrap elements from previous projects ...

I used one of my {free download} vintage labels from here and here, my {free download} mini chocolate wrappers from here, and scraps of scrapbooking paper (red dot print), ribbondiamond wrap from here and crystal stickers.  

I used a heart shaped punch to cut out my mini chocolate wrapper and I made the heart shiny by adding a layer of Inkssentials Glossy Accents and some clear glitter. All elements were attached to the card using two sided tape. The red machine stitching was added for a fun and unexpected detail ... I have been machine sewing on my scrapbooking and card making projects for years so it is part of my personal style.

Have you used any of our products and/or my downloads in one of your projects? Have you used our products at a party, wedding, special event? If so, I'd like to hear from you. Leave me a comment on this post with links to your blog or website. You can also email me your pictures! I would love to feature more of our talented customer's work on our blog!