Showing posts with label wishing well. Show all posts

Let's Party to the moon and back

Thursday, 5 April 2018

let's party to the moon and back - first birthday party | Creative Bag

Our customers really like to plan amazing parties. And whether you are a professional party planner or someone who just like to host fun birthday parties for your children, we have everything that you need to get the party started. 

Check out this adorable "fly to the moon" themed party that was pulled together by Janet Kwan from Janet Kwan Photography for her nephew's first birthday. 

let's party to the moon and back - first birthday party | Creative Bag

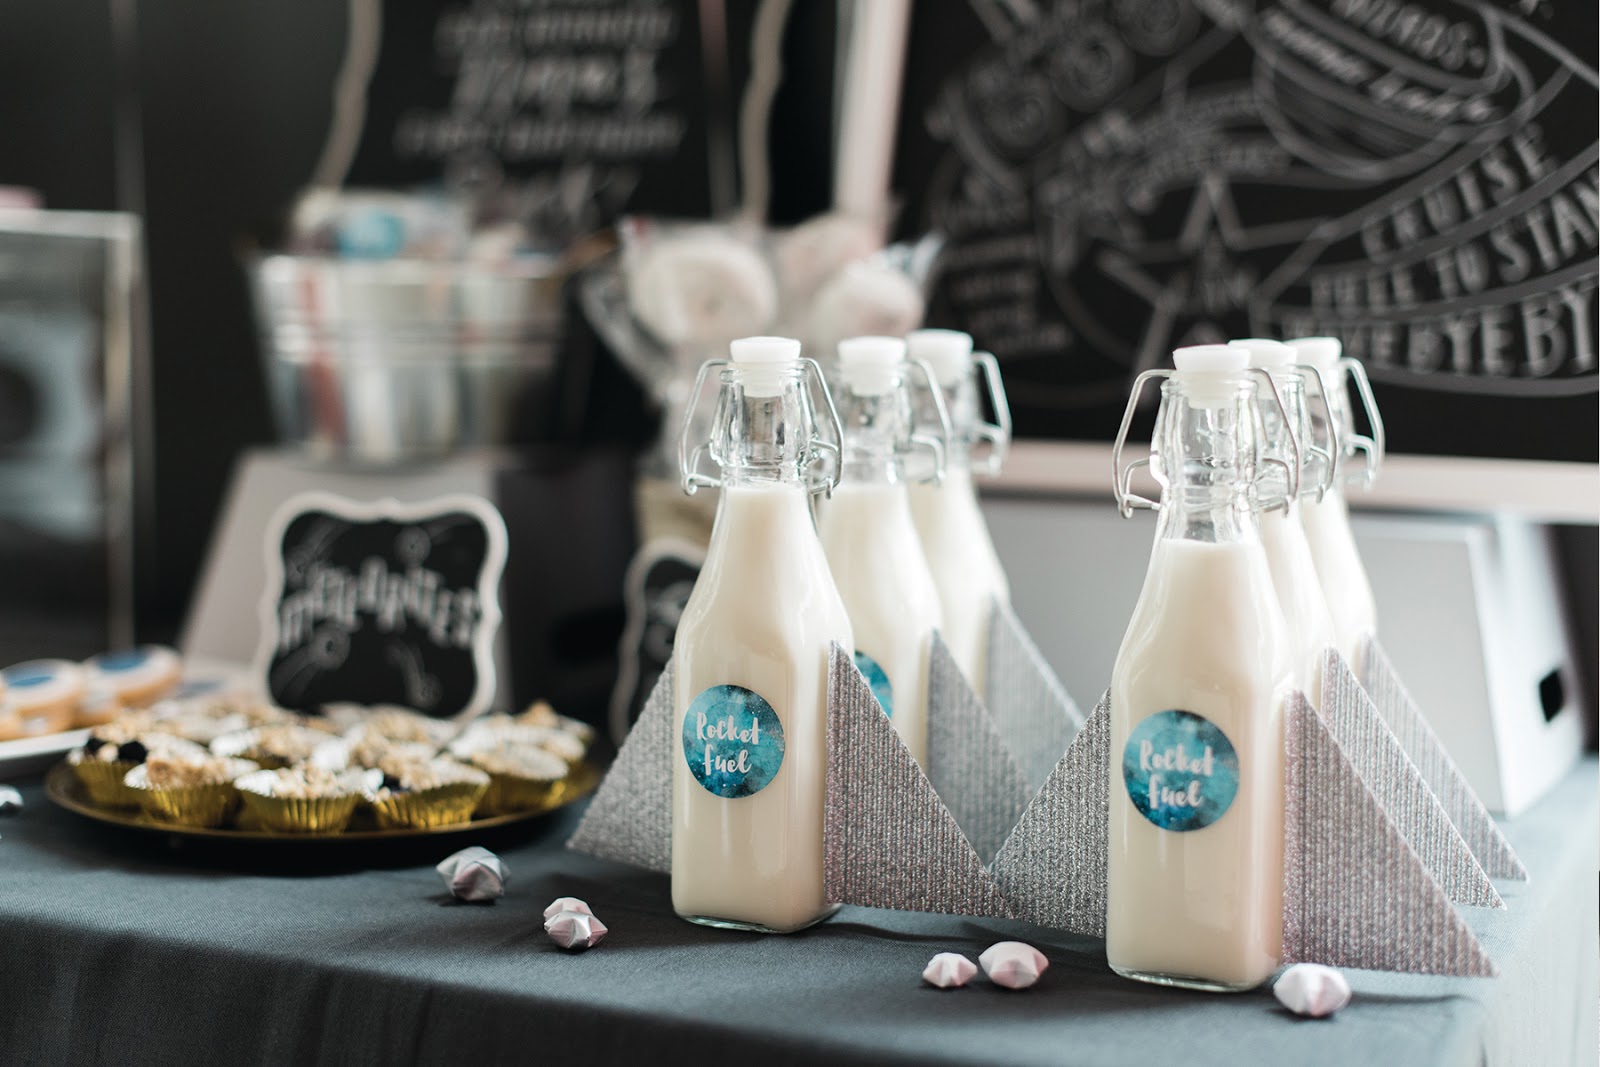
Janet had a little help from some of her creative friends with a number of the party details. I personally had fun creating a few of the diy projects for the party using some of our products. These "rocket fuel" milk bottles were created using swing top bottles, silver corregated paper "wings" and custom printed labels.

let's party to the moon and back - first birthday party | Creative Bag

Chalkboards were hand lettered with quirky little saying by Doris Wai from Love Lettering

let's party to the moon and back - first birthday party | Creative Bag

You may remember seeing the phantom acrylic wish well in this wedding post or this baby shower post. We think that this is one of the most imaginative uses for this popular acyclic box and proof that it can be used for more than just a wishing well at a wedding. The box was embellished by Doris using water based paint and used as a riser for the amazing custom birthday cake.

let's party to the moon and back - first birthday party | Creative Bag

The blast off cake and all of the adorable space themed party sweets were made by Tiffany Su from Made With Love

let's party to the moon and back - first birthday party | Creative Bag


let's party to the moon and back - first birthday party | Creative Bag

Paper origami wishing stars where placed inside a shadow box that featured a custom watercolour illustration by Karen Wong Chiu from Oh My Inspired.

let's party to the moon and back - first birthday party | Creative Bag

Assorted sizes of white paper lanterns were decorated with tissue paper polka dots and watercolour paint to look like planets.

let's party to the moon and back - first birthday party | Creative Bag

Doris added her hand lettering and drawing skills to a number of items that were meant to be used as party decor keepsakes.

let's party to the moon and back - first birthday party | Creative Bag

Guests went home with rock candy favours packaged in clear candy bags with custom stickers featuring the watercolour illustration by Karen.  

let's party to the moon and back - first birthday party | Creative Bag

Thanks to Janet Kwan Photography for sharing her incredible party photos with us.

We'd love to see how you use our products at your party, wedding or special event. Tag us using #creativebaginspire or @creativebagco so we can see your photos! 


let's party to the moon and back - first birthday party | Creative Bag

Inspiration: boho wedding part three

Thursday, 22 June 2017

wedding inspiration: boho wedding reception details including a number of diy ideas | Creative Bag

When planning a wedding or party it is often the tiny details that end up being the most remembered part of the day. In this last post about our boho inspired wedding, we are going to share what we consider the most memorable details from our inspirational styled shoot.

wedding inspiration: photo booth from boho wedding reception | Creative Bag

1. Make them smile.

This stunning stand alone 8'x8' handmade paper flower backdrop created by Confetti and Bows just makes you want to smile. 

A single chair, a hand lettered sign and a few photo props set off to one side of the floral backdrop invite guests to hang out and snap a few photos. The hand lettering on the mirror and the sweet Posecards were by Love Lettering. A couple of flasks and mini paper flowers make fun photo props as well.

wedding inspiration: boho wedding reception details including a number of diy ideas for favours | Creative Bag

2. Best favours ever.

If you have the time, what could be more personal than creating or wrapping your wedding favours yourself? 

You can find the DIY tutorial for these mini mason jar favours in this post

Simple (and inexpensive) white gift boxes look amazing when you place real, silk or paper flowers on top. Keep the flowers in place using satin ribbon. Alicia's Infinity designed the custom sticker to match her wedding stationery.

wedding inspiration: boho wedding reception details including a number of diy ideas | Creative Bag

wedding inspiration: boho wedding reception details including a number of diy ideas | Creative Bag

3. Family matters.

We added personal touches to the gift table by displaying "something old (photo of the groom's grandparents), something new (acrylic wishing well), something borrowed (vintage cake topper from bride's grandparents) and something blue (ribbon tied around the photo)". The acrylic wishing well was personalized by Doris from Love Lettering with a hand lettered message and floral design.

wedding inspiration: boho wedding reception details including a number of diy ideas | Creative Bag

4. Add a little gold. 

The white hobnail vases were given a modern boho "dipped in gold" effect by masking off the bottom of each vase with torn edge painters tape before spraying on the gold metallic paint. Periwinkle Flowers was inspired by the watercolour flowers, succulents and foliage in the wedding invitations. 

Gold was added to the "best day ever" cake topper on the wedding cake. You can find the DIY tutorial for how to add the gold in this post.

We placed gold and white paper lanterns, watermelon round paper lanterns, balloons, and tissue & mylar tassels around the venue to highlight the different stations at the reception.

wedding inspiration: boho wedding reception details including a number of diy ideas | Creative Bag


Styled shoot credits:

Creative direction and DIY projects : Lorrie Everitt
Packaging and wedding supplies Creative Bag
Photography: Attakat 
Cake and Sweets:  Cakelaine 
Floral: Periwinkle Flowers 
Hand Lettering: Doris Wai from Love Lettering 
Stationery: Alicia's Infinity 
Furniture and Tableware: The Perfect Table 
Paper flower wall backdrop: Confetti & Bows


Location:  TheWarehouse Event Venue 


Wedding Guest Book Alternatives

Friday, 18 January 2013

Our booth at the Total Wedding Show is all set up and I'm so excited to be there tonight and this weekend. Who wouldn't be excited to stand around and talk to a bunch of happy people who are in love and want to tell you about their dream wedding. Honestly, I think that I have the best job in the world ... it also helps that I work at one of the best companies in the world. 

There will be lots of new wedding products coming into the stores in the next few weeks, but until then there are many new products available right now online at Creative Bag Wedding. I think that some of the new guest book alternative products are awesome and I wanted to show you some of them today. These guest book alternative are shown as wedding but most of them would also work for an anniversary party, bridal shower or even a special birthday party. 

Here's my three favourites ...

This is sleek and modern looking with a touch of diy. Guests sign their names on a die cut heart and then place it in the shadow box set out on display. The signed hearts create a unique piece of art that  can be placed on a shelf or hung on a wall for years to come. The shadow box can be engraved for personalization.

Perfect for a couple that likes to travel or a destination wedding. A fun and whimsical container that can be personalized with a monogram on  the faux leather luggage tag.
Novel paper airplane stationery can be purchased separately for guests to sign and fold. Instructions for creating the paper airplanes are included on a tent card that you can display for your guests.

This container also becomes a piece of art when it is complete. Guests write hand written messages on mini scolls and insert them into a mesh screen. The personalized wish cards are ordered separately and there are many different colour and design options so you are sure to find something that is perfect for you.

Still want to see more guest book alternatives?
Check these out too ...


And of course, if you are looking for a beautiful guest book ...
we have lots of those too!

If you are getting married and live in the Toronto/GTA area, I hope to see you this weekend at the Total Wedding Show!

glass jars + daisy lids + paper straws = party to remember

Tuesday, 29 May 2012


I was thrilled to see all of the new jars and metal daisy lids that arrived in the stores (and online) a little while ago. These little glass containers are perfect for parties and weddings! Add your favourite drink, a daisy lid, a paper straw and perhaps a few "embellishments" and I'm sure that your guests will be talking about these all night. The best part is that they are so simple to make and you can personalize them to match your theme.

Here's a few ways that I decorated these jars with the daisy lids ...
If you have been following this blog, you will already know that I love baker's twine and try to find a way to work it into many of my projects. Here I used red and white baker's twine to hold a mini paper tag that I punched with a decorative paper punch. I added a red and white striped paper straw to co-ordinate with the baker's twine.
Note: We sell these tags and paper punches in the Creative Studio area at the Toronto store only.
This next jar was decorated with a paper flower that I tied onto the jar with a green satin ribbon. I made these same paper flowers to decorate a wedding favor and wedding money card box earlier this year and I thought that this would be a sweet addition to that wedding's decor. You can see my paper flower making tutorials here and here.
And one more simple idea is to just attach glitter tape to your straws. I cut the ends of the tape to look like a little flag.
Note: we currently only sell the glitter tapes in the Creative Studio at the Toronto store.
If you are looking for more ideas with these jars, here are some of my favourites that I have pinned to my boards on Pinterest ....
and here are the links to the pictures one, two, three, four, five, six, seven!

And if you are looking for some fun drink recipes for the summer to serve in these beautiful containers, here's three that I have pinned and looking forward to trying this weekend at the cottage: 1. watermelon & strawberry lemonade, 2. raspberry lemonade and 3. frozen strawberry mojito (will make this one after the kids have gone to bed).

If you missed my last blog entry ... I have a giveaway going on that is open until May 31st. If you leave a comment on this post you will be included in the draw ... leave a comment on both posts for two entries!! Good luck.


Lauren and Adam's wedding { project} no. 2

Thursday, 24 May 2012

Lauren and Adam's wedding is just a little over a month away and I'm going to share with you another project that I have created for them ... their money/gift card holder. Lauren had a difficult time deciding which card holder she wanted for her vintage themed wedding. She really liked the birdcage card holder by Weddingstar but was not loving the colour and thought that it was too dark. But I knew that we could make it work for her wedding if we spray painted it in a colour that would co-ordinate with her wedding decor and she agreed to try it out.

I personally love this Weddingstar birdcage card holder because I would use it after the wedding as part of my home decor. Here's a few ideas that I have pinned ...
For my home, I would stack a few vintage books, a small framed picture and a cast iron bird inside the birdcage to create a little vignette.


Lauren had already selected the antique white french provencal tin containers (see above) for her wedding favors and I knew that it would be easy to find a spray paint in a similar colour at the local hardware or paint store.
Here's some of my tips for doing this project:

1. Give yourself at least a week to do this project ... this is NOT a day or two before the wedding kind of project!!
2.Take your time and do a little bit everyday (especially if it is humid) so that you can layer multiple fine coats of paint ... do not over spray or you will see drip marks.
3. Work in an area that will allow you to leave the birdcage to dry for a length of time.
4. We used a spray paint designed for metal - matte or glossy finish is up to you.
5. I took a large box from the grocery store and cut it up to make an area to spray inside ... this kept the paint from spraying all over my work area and made clean up easy.

To keep with the vintage theme, I shredded old book pages for the bottom of the birdcage. Lauren and Adam will be displaying the birdcage on a small round table with a table cloth near their sweetheart table at the reception. The "xoxo" canvas banner that I created here will be attached to this table.