Diamond Wrap Give Away

Saturday 28 January 2012

We had another great day at the National Bridal Show today. One more day to go!

I talked to so many people about our beautiful jewel diamond wrap. Everyone loved it and wanted to know what colours does it come in, how much is on a roll, can you cut it, what can you do with it? I'm sure that we will be seeing jewel diamonds in many weddings this year.

You can find out all about our diamond wraps here on our website.
I'm so excited to announce our first blog giveaway ... in honour of all of the wonderful brides and brides to be that we have meet this weekend at the National Bridal Show we are going to giveaway a roll of diamond wrap to one of our lucky blog "followers"!

Sound like fun? Here's how you can enter our giveaway:

1. Become a "follower" on this blog.
*If you are already a follower - you are automatically in the draw!

2. Want an additional chance to win? Leave me a "comment" on this post and tell me what colour of diamond wrap you would want if you win and what will you do with the diamond wrap. I'd love to hear your ideas whether it is for a wedding, shower, party or craft project.

I'm going to do a draw in the morning on Friday February 3, 2012. I'll announce the winner later in the day on the blog. So remember to check back on Friday to see if you have won.

Here's some of my projects using the diamond wrap that were on display at the show ...
favor boxes ...
chair backs ... by the way, thanks to the nice people at Vontra (beside our Mississauga store) for lending us one of their rental chairs for the show! ...
clipboards ...
and of course the card box that I talked about here.

Good luck!


National Bridal Show this weekend!

Friday 27 January 2012

I just got home from the National Bridal Show and  I wanted to do a quick post to thank everyone who visited us tonight. Lisa and I had a great evening. We met so many wonderful people ... brides, grooms, mothers, grandmothers, sisters and best friends.

I was so excited to hear what people were planning ... so many different ideas.

The show runs all weekend! If you are at the show please stop by and ask us how to win the $100 Creative Bag gift cards that we are giving away to three lucky winners!!

Decorate it yourself wedding card box

Tuesday 24 January 2012

We've been busy the past few weeks getting stock and samples ready for  our booth at the National Bridal Show in Toronto this weekend.

I just finished creating a sample card holder box to display at the show. It looks like a wedding cake and I thought that it would be cute to display one of our cake toppers on.

Here's what the paper mache box set looks like when you buy it. There are three boxes that stack together and there is plenty of space inside for cards. The boxes are white and ready to be painted or decorated however you want.

I decorated the box with a mix of papers (kraft paper, scrapbook papers and old book pages), diamond wrap, rhinestone stickers, and tulle.
Here's a close up of the card box. You can see my tutorials for making paper flowers and paper pops here.
I also decorated one of our small mod boxes as a favor box to co-ordinate with the card box. I'd like to offer this project as a workshop or a demo at the Toronto store one day next month. I'm still working out the details but if this sounds like something that you would interested in doing/attending, leave me a comment on the blog or send me an email and I'll make sure that you are notified when more details are available!
And for those brides that are not really into "diy projects" ... we also have a selection of card holders and wishing wells just for you! You can see them and many more of our wedding products at www.creativebagwedding.com

Well off to do some more samples for the wedding show! Have a great week and if you attend the show please stop by our booth and say hello.

decorate paper straws and treat sticks with our {free} flags

Friday 20 January 2012

I was so excited when I saw the new paper straws arrive in the Toronto store the other week. I have been pinning pictures of paper straws from weddings, parties and sweet tables, so I know that I am not the only one who loves them.

One of the great things about paper straws is that it is very easy to personalize them. So with that in mind, I designed a page of pink and red flags as a free download. The colours in the flags match my pink and red vintage label downloads and would be perfect for a Valentine themed party.

As always, this download is for personal use only. No commercial use is permitted.
The flags can be used on paper straws and treat sticks ... here you can see that I added them to cakepops and displayed them on our wooden market serving trays!


Here's a quick overview on how to attach these flags to straws and treat sticks.
Print the download on heavy weight paper on your colour printer.
1. Cut the flags out and fold each flag in half.
2. Add two sided tape to the back of 1/2 of the flag as shown.
3. Peel the backing off the tape. Position the flag on the straw or treat stick and press the flag together starting at the ends and working towards the (fold) straw/stick.

Personalized paper straws and treat sticks ... a simple and creative way to make your next event "your own".  I hope that you try this out! Let me know if you use my flags - I'd love to see them in use!

valentine treat bags

Sunday 15 January 2012

Last week I posted about how to use the free download for my vintage labels  on glass containers and vases. Today I thought that I show you some examples of how I used the same vintage labels to decorate some of the large bitty bags.

The bitty bags could be used as a treat bag at a Valentine party but the concept would also work as loot bags for a birthday party or favors for a wedding.
I used the vintage labels on the larger sized bitty bags but I wanted to show you the smaller bitty bags too because they are the perfect size for mini chocolate bars and I've designed a mini chocolate bar wrapper that I will share with you later in the week.
(a) I used the vintage label with a manilla shipping tag, ribbon and a piece of glitter tape to decorate the first large bitty bag. I used a couple of pieces of two sided tape to keep the papers in place on the bag before I sewed the bag on my sewing machine. I used pink thread so that the stitching would stand out. I used this same sewing detail on all of the bags.
(b) I didn't use the vintage labels on either of the little bitty bags but I did sew the bags to seal them up after adding my mini chocolate bars. I used scraps of papers, a metal rimmed tag and rhinestone elements to decorate a tag for this bag and attached it to the bitty bag with a small clothepin decorated with divine twine. I created the word "love" on the tag by cutting letters out of an old book.
(c) This is the other smaller bitty bag that I created. I punched a single hole in the bag above the stitching so I could attach a metal rimmed tag to the bag with a piece of divine twine.
(d) And here's a close up of the last decorated bitty bag. I covered the words on the vintage tag with a piece of glitter tape and I added a fun little feather boa. Our mini feather boas have a peel and stick backing so they are easy to attach to just about anything. I can see this bag being used as a loot bag for little girl's party.

I'll be back later this week with another free download!


Push Pop containers have arrived!

Wednesday 11 January 2012

Our Push Pop containers have arrived!

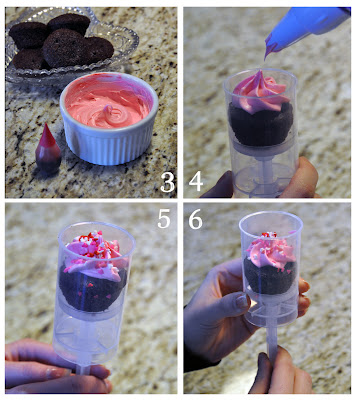
These fun little containers are sure to be a big hit at weddings and parties. We are just starting to see all kinds of creative ways to use them with baked goods and frozen treats. My kids and I made some on the weekend and we filled them with mini cupcakes. Here's a tutorial of how to use these push pops containers with mini cupcakes ... 

First you want to gather your supplies: push pop containers, mini cupcakes, icing (food colouring if you want a coloured icing), icing bag with tip (I used the Wilton Decorator Plus because I find it easy to use with the kids), and sprinkles.
1. I took the containers apart and washed them with warm soapy water before we got started filling them. That's one of the things that I love about these containers - you can wash them out and reuse them again!
2. With the container pushed up about 1/2 way, we inserted our first mini cupcake. The cupcake should be just a touch smaller than the container so that you can easily move the stick up and down with the cupcake in place. Tip: I found that the tops of some our cupcakes baked up a little bigger than we wanted so I used a knife to trim off a little bit of the top edges.
3. I wanted these cupcakes to work for a Valentine themed party so we coloured our icing pink and used pink/red/white mini heart shape sprinkles. 4. Next you will want to add your icining to the cupcake being very careful not to touch the inside edges of the container. If the icing touches now it will streak later when you lower the cupcake. 5. Add the sprinkles.
6. The next step is to gently draw the stick down to lower the cupcake in the container and make room for the second cupcake.
7. Add your second cupcake, 8. icing and sprinkles.
9.& 10. Add the top to the containers and you are done!

I think that these would be so cute for a wedding. You could decorate the containers with ribbons or a decorative sticker to co-ordinate with your colours/theme. If you make these I'd love to hear what you did with them - leave me a comment on this post or you can send pictures to me here.  I have a feeling that I will be making these again in the not too distance future ... I saw a cute recipe for push pop s'mores that I'm going to try next!!

Do you live in the Toronto area? Getting married soon or know someone who is? Our friends over at Riche Bridal are having their annual Bridal Gown sale this week! They have dresses for everyone in the wedding party up to 80% off regular retail.

vintage labels for your sweet{heart} bar

Sunday 8 January 2012

Sweet bars are becoming more and more popular for weddings, showers, birthday parties and holiday get togethers so I thought that it would be fun to design some labels to add to some of our glass vases and containers. Since Valentine's day is not too far away I decided to use red and pink as my colour inspiration.


This art is for personal use only - no commercial use please.


Here's what you will need to complete this project:
heavy white cardstock, colour printer, scissors, single hole punch, two sided tape, and matching ribbon of your choice.

I designed these labels in red and pink to co-ordinate with our bitty paper bags . I will be doing another post soon to show you how to use these labels on the bitty bags for Valentine's day!

The first step is to print out the labels on heavy white cardstock on your inkjet or laser printer.

Next you will want to cut the labels with a pair of scissors.
Simply use the coloured outline of the vintage label shape as your guide for cutting.

You can attach the labels to your glass vases or containers a few ways ... here are two of my favourites ...
1. You can tie the ribbon around the glass vase or container first. I simply tied a knot at the back and the ribbon stayed in place. Then I attached the paper label to the ribbon and glass using two sided tape.I used a narrow red ribbon with white stitching on my sample for a fun Valentine party but I was making this for a wedding I would have selected a wider satin ribbon for a more elegant look.


2. The other way to attach the labels to the container is to use a single hole punch to make two holes in the label (as shown). Cut one piece of ribbon that is long enough to go around the glass container/vase and tie a knot/bow. Thread the ribbon through the two holes on the label as shown in the picture above and tie the ribbon in place with a knot at the back. If you are not able to tie the ribbon tightly enough to keep the ribbon/label from sliding down, you can add a small piece of two sided tape to the back of the label to hold the label in place before you tie the ribbon.

Looking for more inspiration for a sweet bar? Check out my pinterest food bar board.

A New Year and A New Blog

Tuesday 3 January 2012


Happy 2012!! It's a new year and to celebrate we are launching our New Blog! We want you to celebrate. entertain. create. with us all year long ... so please join us often for lots of inspiration, tutorials, downloads, giveaways and contests.

Did you get engaged over the holidays? Planning a wedding for 2012? Creative Bag Wedding has lots of new products to help you "create your dream wedding at warehouse prices". Our three stores are going to be exploding with new wedding products over the next few months and we are starting to work on a new wedding showroom at our Toronto location ... stay tuned for more details in the next few weeks.

If you are in the Toronto area, we will be at the National Bridal Show on January 27-29, 2012 at the Direct Energy Centre, Exhibition Place. If you are planning to attend the show please stop by and say hello!