Creative Bag Wedding Contest 2012

Friday 30 March 2012

Are you getting married this year?

Do you love to look through bridal magazines, websites and pinterest to find ideas and inspiration for your special day?

Are you planning to use some of our products in your wedding plans?

Would you love to see pictures from your wedding day featured on our blog?

IF you answered yes to all of the questions above ... then you are going to love the Creative Bag Wedding Contest 2012!!!

We are looking for fabulous stories and pictures from our customers highlighting our wedding products. Whether your wedding is a "diy" or pulled together with the help of a wedding planner, we want to hear and see what you did to create your dream wedding.

How to Enter.
We will be accepting entries for the contest from July 1st, 2012 to December 31, 2012.
Email your entries here to enter.

On your entry, please remember to include your personal information so that we can contact you. We will need your names (both the Bride and Groom's full names), your wedding date, your home town, an email address and a telephone number that we can reach you at.

Please note that if your wedding is before July 1st you can still enter ... take your photos and draft a short story to tell us what you did and just wait until July 1st to submit everything.

Are you getting married in 2013? I hope to run this contest twice a year so keep us in mind as you are planning your special day for next year.

Grand Prize.
One happy couple will receive the grand prize of a $200 Creative Bag Gift Certificate.
We will announce the name of our grand winner on January 10, 2013 on our blog.

All Entries will be Reviewed Weekly by our Judging Staff. 
We want to share your dream wedding stories with everyone so our judging staff will review all of the entries weekly. I will feature entries from the contest on our blog as the contest is running.

Photography Notes.
We are looking for great photography that can be featured on the blog so you may want to ask your photographer to take some extra pictures of the wedding details that you'd like to share with us. All pictures should be a minimum size of 4"x6" and 300 dpi.

What kind of pictures are we looking for? We are especially interested in unique ideas and personalized projects, great themes and beautiful colour schemes, details from the wedding ceremony to the end of the day at the reception.

You should also include a picture or two of the bride and groom and any other special photos that help to illustrate your wedding story.


Tell Us About Your Dream Wedding.
Along with your photos, please give us a short story about your wedding. Tell us what  Creative Bag products you used. If I require more information for the blog I will contact you.

Sound like fun? I hope so! I'm looking forward to receiving lots of entries and being inspired by YOU. If you have any more questions about the contest leave me a comment on this post and I'll get back to you.


Some bunny loves you ... Easter packaging and {free} Easter gift tags

Monday 26 March 2012

Just in time for Easter planning ... here's a fun way to package a small chocolate bunny and a selection of colourful candies in our clear air tight jars. These clear jars are great for kids because they are not glass and the kids can use them afterwards to store crayons, craft supplies or small toys.

Packaging instructions:
1. Gather your supplies. A large clear jar, a small solid (or hollow) chocolate bunny that will fit inside the jar once the lid is closed, small colourful candies (I used M&M's in the limited edition spring colours), twine and assorted ribbons and if you want to use my {free} Easter gift tags you will need my download and either our Clean Edge 80lb card tags (KP10) or cardstock paper. You will also need scissors to cut the ribbons.
2. I filled about 1/4 of the jar with the M&Ms. If you just drop them into the jar the candies may break - so be careful.
3. Then I gently inserted the chocolate bunny into the centre of the jar and continued to place a few more M&Ms in front and behind the bunny to make sure that the bunny stood straight. You don't want to completely cover the bunny so don't add too many more M&Ms ... it's okay to eat a few of the M&Ms if they don't all fit (I won't tell the kids if you don't!)
4. Close the lid on the jar and now you are ready to tie an assortment of different ribbons to the outside of the jar as a decorative element. I used a variety of different kinds of ribbon (satin, organza and grosgrain) in an assortment of colours (similar colours to the candies inside) and all of varying widths. I did not tie the ribbons in any special order ... just start tying the ribbon onto the metal hinge and continue to tie on ribbons until you have the look you want. If you use my gift tag, you may want to attach it with a piece of twine as I did. I also tied some twine around the jar - just above and below the metal band ... you should be able to see it in the last two photos above.

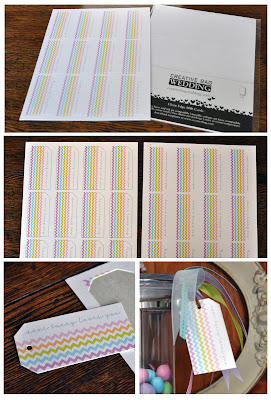
  I created a chevron gift tag that can be attached to these Easter gifts and they were designed to be used with our Creative Bag Wedding Clean Edge 80lb cards (KP10) ...
We don't sell these cards on line but they can be special ordered in all three of our stores. Our Toronto store has inventory of select shapes and colours of the Clean Edge cards in packages of two sheets. I love the Clean Edge cards and Exacto labels because they match our Options Wedding Favor Boxes so if you want to make tags or labels to match your favors these are amazing.

I created the download so that you have two options - 1. print them on the "tag shaped" (KP10) Clean Edge 80lb Card using the download that is "print ready" or 2. print them on plain white card stock using the download showing the tag outline and cut them out by hand.
Here's my tips for printing on the 80lb Clean Edge Cards.
1. I used my ink jet printer at home - my printer is made by Brother and is from their "professional series" model MFC-J6510DW.
Note: the matte coloured cards are laser and ink jet compatible, the metallic colours are laser compatible - so make sure that your home computer is compatible before you start printing.
2. I used the manual feed on my printer because the 80 lb Clean Edge Card was too thick for my paper tray and it got stuck the first two times I tried. I was able to print the metallic coloured cards on my ink jet printer but I know that they WILL NOT PRINT on ALL ink jet printers.
3. I test print on plain white paper anytime that I am using special papers on my home printer to make sure that the document is set properly and the ink is good.
PLEASE do not skip this step ... you'll thank me later for this tip!
4. When you are printing my art do not set the printer to "size to fit" ... the art is the correct size for the template and will print properly if left alone.
5. Select "best quality print" and if you have a "vivid" colour mode select it as well so that the pastel colours don't fade.
6. You want to use my "print ready" download for the Clean Edge Cards ... this version does not show the outline of the tag shapes ... you don't want to print the tag outline.  The art is made to "bleed" off the die cut edges ... that is so that if your printer is slightly off the art will still print to the edges. You want to keep this in mind if you create your own art for these tags on line.
7. Once you have printed your tags you can pop them out as you need them. You can store your unused tags in place on the sheet ... it's easy to keep them in a file folder on the sheets and you can store the left overs for next year.


you can print these on plain cardstock and cut out with scissors and finish with a hole punch.


sweet tables, glass containers and more {free} labels

Thursday 22 March 2012

Whether you are planning a wedding, shower, birthday party or another celebration - it seems like sweet tables and food bars are more than just a trend. I've been pinning pictures of sweet table decorating ideas for a while and I've seen so many amazing presentations that it makes my head spin. I'd love to throw a party just so I can have an excuss to create a sweet table or food bar.


One of my favourite details of most sweet tables (aside from the yummy food) is the decorative containers that are used to contain and display the food. I'm so excited that we have brought a number of different glass containers and vases into the stores that can be used at sweet tables and food bars. We are expecting more glass containers in the next few weeks and I'm sure that I will be telling you more about them when they arrive.

These glass jars with lids are my favourites right now .... and they look so sweet with the vintage labels that I created earlier this year for Valentine's Day. There have been a few customer requests for me to create more of them so that they can be personalized for birthdays and weddings. So I decided to create a pdf of blank labels.
Please note that these labels are for personal use only.

Of course, after I created the labels in black and white ... I had to create colour versions as well so that they could easily co-ordinate with some of the colours of our paper straws and bitty bags .... so there are 8 colour versions to download as well ...

Download the coloured vintage labels here by clicking on the colour name:

I have a number of projects on the go and I will be sharing more details with you soon. One of the projects has to do with a special wedding that I'm working on and I can't wait to share some of the projects with you. I am also going to make an announcement about a new contest that I know will appeal to our "wedding" customers ... more about that one next week!


diamond wrap inspiration from pinterest & a bridal spa sampler afternoon

Saturday 17 March 2012


I LOVE Pinterest ... it is not only where I keep and organize photo ideas for projects that I am working on but it is also my number one source for finding the newest trends, inspiration and ideas. You can see and follow my pinterest boards here. Today I thought that I'd share with you some of my favourite pins that feature diamond wrap

Diamond wrap is one of the most popular items for wedding and I think that it is because you can incorporate this beautiful roll of "bling" in so many ways to so many different elements of a wedding or special event.

Pinterest photo credits:
1. decorative wreath from etsy, 2. chair back, 3 & 4. centre pieces from tumblr, 5. candles, 6. wedding cake and 7. birthday cake from etsy.

I used silver diamond wrap to decorate two of our glass vases. The table numbers and card holders are sold in stores and online
Here's how easy it is to adhere the diamond wrap to the vases. I used a new two sided tape that is in the Toronto store right now called "SuperTape". The tape is heat resistant so if you are going to use the glass vase with a candle you don't have to worry about the diamond wrap falling off of the glass if it gets warm. Cut the diamond wrap with regular scissors to fit your vase. It is easy to cut, does not fray and you can make the bands as wide and long as you want. I used two pieces of tape on each piece of diamond wrap and place them close to the two longest edges as seen in the centre photo above. When I adhere the diamond wrap to the vases I start at the front of the vase with the middle of the band and work my way around to the back.
The diamond wrap can be the only decorative element that you add to the vases as seen in the first photo on the left. It looks simple and elegant.
If you want to add another pop of colour and texture you can add a ribbon accent as I did in the centre photo. I used the glitter lame ribbon with wire so that I could just knot the ribbon and use the wire to create a bow like effect.
In the last photo on the right, I tucked a table number sign into the ribbon. This is a great option if you are trying to keep the number of elements on the table to a minimum.

I will have diamond wrap and many more of our wedding products on display March 31st at Featuring ... You Spa & Salon in Toronto.
I will be joining the staff of Featuring ... You Spa & Salon for a Bridal Spa Sampler Afternoon. We just found out that Jane Dayus-Hinch from Wedding SOS (a very popular SLICE television show) will be joining us as well so I'm sure that it will be a fun and entertaining afternoon. If you are interested in attending please RSVP to fyi@featuringyouspa.com by March 23rd. Space is limited so please don't wait until the last minute. I hope to see lots of you there. I will be doing a draw for a $100 Gift Certificate to one of our stores at the event and there will be other draws and giveaways going on!

wedding favor ideas from our customers

Monday 12 March 2012

Today I wanted to share with you some wedding favor ideas from our customers. Sandra Bretz is a regular at our Mississauga store and I just adore the custom designed hand-decorated cookies that she creates for special occasions. The photos above show some of Sandra's beautiful cookies packaged in our damask pillow boxes and chinese take out boxes. Sandra tells me that these were created as favors for a wedding and that the bride and groom selected the black and white damask packaging.
Here's a few more of Sandra's cookies ... I love the simple packaging of these with the clear candy bag and simple ribbon tied at the top ... these would be lovely at a bridal shower! If you are interested in contacting Sandra she does not have a website or blog but you can reach her by email here.

Just before Valentine's day I wrote a post about my mini chocolate bar wrappers that can be personalized for Valentine's day. One our our customers, Arlene, sent me an email recently and asked if I could revise the words on the wrappers so that she could use them as wedding favors for her big day. So for Arlene and anyone else out there that would like to use these for their wedding ... here's the new art!
You can see the tutorial for how to print and use these wrappers here.


If you are looking for full size chocolate bar wrappers ... we sell them on our website as well. There are lots of different designs and they can be personalized online.

diy paper flower favors - part two

Thursday 8 March 2012

As promised at the mini workshop on the weekend ... here's the instructions for how to recreate your own paper flower favor kits so that you can mass produce these for a wedding or party. Just remember whatever colours of papers and materials you use will make these uniquely your own.

I created this template of the different shapes you will need to cut out for this project. You will see that I indicated what tool I used to cut each shape. You can download the template here.
Please note: that if you are just interested in making a few of these, you can use my template as a guide to trace and cut the shapes by hand. If you are planning on making a lot of these I would highly recommend purchasing the tools.
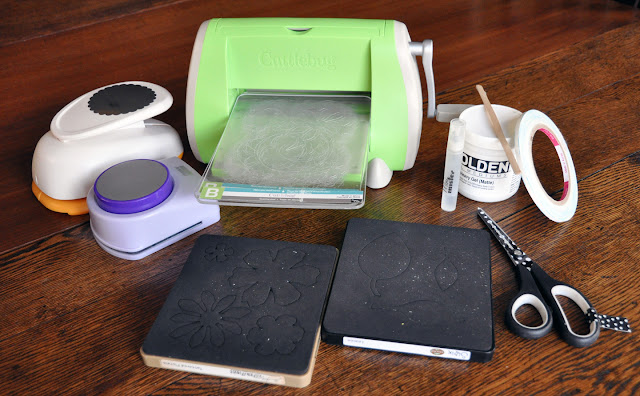
Here's my list of tools to make and assemble your own paper flower kits:
1. Cuttlebug die cutting machine*
2. Sizzle Bigz die - Tim Holtz Alterations "tattered florals"*
3. Sizzle Bigz die - Eillen Hull "leaves"
4. circle paper punch - 3" diameter
5. scallop circle punch - 3.5" diameter
6. small water mister
7. Golden Gel Medium "heavy matte" - or you can use white glue or a hot glue gun
8. two-sided tape
9. scissors

We have just received some of these tools in the Toronto store this week. The Cuttlebug retails for $89.99 and the Sizzle Bigz dies are $19.99 each. They are in the Creative Studio space if you are looking for them. We did not order large quantities so if we are sold out of something that you were looking for let us know and we will special order more.

The other materials that you will need to create these favor boxes are:
1. small mod boxes  - I used the kraft coloured boxes. There are many colours options to select from that are stocked in the stores or can be special ordered.
2. diamond wrap - I used silver (the new shipment of silver just arrived!!). Use whatever colour works for your wedding or event. You will need to cut the diamond wrap into 11.5" lengths. From each 11.5" length you will cut 6 strips (four rows of diamonds high) to fit the small mod box lid.
3. tulle - I used white, but again there are lots of colour options (some with glitter!) so select what works best for you. I cut two small 1.5" square pieces of tulle for each favor box so you will have lots left over for other projects and decorations.
4. scrapbooking papers and old books - use what works for you. Pages from old books work well for a vintage theme. When you are selecting coloured papers, I recommend buying two sided papers for the flowers. The easiest way to co-ordinate colours if you are doing more than two colours is to purchase a pad of paper because the colours will already be co-ordinated for you and eliminate a lot of guess work.
Here is a quick tutorial for how to use the cuttlebug die cutting machine with the Sizzle Bigz dies. I demonstrated how to do this at the paper flower mini workshop so this will be a reminder for some of you. You will need a large metal die and the two "B" plates that came with your Cuttlebug.
1. Cut your paper to either fit the size of the metal die (if you want to cut all of the shapes on the die) or to fit the size of the shape you wish to cut (plus a little extra in case the paper moves slightly when you are cutting).
2. Open the Cuttlebug as shown and place the first "B" plate on one side of the machine as in the picture. I am right handed so I positioned the Cuttlebug so that the handle is on the right side.
3. Now place your die on top of the "B" plate with the black foam side facing up. Put the paper on top of the shape(s) to be cut from the die.
4. Complete your "sandwich" by placing the second "B" plate on top of the paper. And now you are ready to cut.
5. Place your left hand on top of the Cuttlebug as shown and use your right hand to turn the handle and continue to turn the handle until the "sandwich" passes completely through the machine to the opposite side.
6. Take the "sandwich" apart and remove your die cut shape and the excess paper.

Depending on how thick your paper is, you can more than one piece of paper at a time. I've used two or three pieces of regular weight scrapbooking paper when I have many pieces to cut and it saves a lot of time.

These steel rule dies can cut shapes from many different kinds of materials. Use them to cut cardstock, chipboard and matboard, craft metal, craft plastic, fabric, felt, flexible magnet, poly foam, shrink plastic, vellum and vinyl. I love to cut fabric shapes using my Cuttlebug and I just found out that they have dies for quilt making ... wow, I wish we had that 20 years ago when I was making baby quilts for everyone!!
The number of different dies to cut out seems to be limitless. At last weekend's workshop, I showed another flower die (that just arrived in the Toronto store this week) that can be used on the Cuttlebug and you can view a quick tutorial on my personal blog to make that flower by clicking here.

So now you know how I created my paper flower favor and you can recreate lots of them yourself if you want to. Just remember you can easily make them your own design by using whatever colours you want. 
I hope that you are having a creative day!


diy paper flower favor kit tutorial (my mini workshop recap)

Tuesday 6 March 2012

First, I just want to say thank you to everyone who came out to Creative Bag's Toronto store on the weekend to see me. I know that many of you drove into the city from the north, east and west! I had a wonderful time and we will be doing more of these going forward. I loved sharing my ideas with you and telling you about so many of the great products that we have in the store (and some that are on their way!). If you have any suggestions for future events - please leave me a comment here on the blog or send me an email here. I'd love to hear what you have to say!!!

We had a great turnout for the paper flower mini workshop and many of you purchased the "diy paper flower favor kit" that I created to make at home. As promised, here is a quick tutorial to remind you how to make the flowers and put together the favor box.


In the kit you would have received a copy of my instructions (see above), a round favor box with lid, a strip of rhinestones (diamond wrap), two pieces of tulle, and paper shapes - one large scallop circle, three medium circles, two flowers and one leaf. In the next post I will give you all of the information regarding the tools that I used to cut these paper elements so that you can make more of these favor boxes for a wedding or party.

You will also need: scissors, two sided tape or glue dots, glue or gel medium and a water mister.
The first thing that you want to do is give the two flower shapes some texture and dimension.
Start by using a water mister to spray one paper flower. A light mist of water is all you need ... just enough so the paper will be easy to work with. Next, scrunch the paper flower into a ball with your hand! I know that I surprised many people when I did this at the workshop. It will look similar to the photo second from the right. Then you want to gently open the paper back up so that you can see the petals again. Play with it so that you give the flower a more dimensional look. You can see the difference between a flower that has been scrunched and one that has not in the first picture on left. Do this to both paper flower shapes and set them aside to dry.

Now we will use the scalloped circle shape to make the next flower part. First you will need to cut the circle into a spiral shape as you see in the first two pictures on the left. Mist the paper with your water mister as we did earlier with the flower shapes. Starting in the centre of the circle, create a cone shape using the end of the paper and start rolling the paper tightly together until you get to the opposite end of the paper spiral ... see the second picture from the right. Set the paper down on your work surface and it will open up a bit ... if it is too tight you can play with it to open up a bit or if it is too big you can rewind it again to make it a little tigher. Set it aside and let it dry.


You will do the same technique on the three vintage text paper circles.
I posted a rolled paper flower tutorial using circle shapes on my blog a while ago and you can also check it out if you want. Basically, the plain circles will create rolled flowers with a straight edge ... the scallop circle will create rolled flowers with a scallop edge on a few of the outside layers of the flower.

{Note: I drew a spiral on the circle so that you could get a better idea of what I mean when I say cut a spiral shape. If you want to use a pencil to draw your lines before you cut that is okay ... or just do as I do and cut away! You don't have to be perfect.}
To attach the rhinestones to the top of your favor box you will need to use two-sided tape or glue dots. As you can see in the photos above, I used a single length of two sided tape and adhered it to the middle of the rhinestone strip. Then I attached the rhinestones to the box top as shown. You can do this step before or after you have attached the flowers to the top of the box ... I decided to let the flowers dry while I was photographing this tutorial and did this step while I was waiting.
The last thing to do is assemble the flowers on top of the favor box top.
Please note that I am a mixed media artist and gel medium is my adhesive of choice. You could you could easily use white glue, mod podge or a hot glue gun on these last steps.

First you will want to adhere your two flower shapes together as in the top left picture.
Then you will add a generous amount of gel medium to the bottom of the scallop circle flower and place it on top of the first two flowers to form one large flower.
Use gel medium to attach this large flower to the box top as shown in the top right photo.
You will want to use the gel medium again to adhere the three vintage flowers beside the larger flower ... as you will see in the bottom left photo, I angled the flowers so that they were not all facing up.
The last step is to adhere the two small pieces of tulle into the arrangement. I think that the tulle is a fun, unexpected element and where you put them isn't important ... just tuck them into two spots that look a little more open and make sure that the two pieces of tulle are not side by side. I simply folded the tulle in half twice and added a bit of gel medium to the folded corner. You can use a pencil or wooden stick to position the tulle into place.

The leaf can be used as a gift tag or escort card. In the kits I used paper that had a design on one side only so that you could easily write on the back. The leaf does not have to be glued to the favor top ... it will easily slip into place under the larger flower so that it can be removed.

As I said earlier, my next post will be about how to use the die cutter and paper punches to cut your own papers if you want to make a bunch of these yourself. There are still a few kits in the Toronto store if you want to purchase a kit ... they are $5 each.

Please leave me a comment with your opinion/ideas on mini workshops and demos. I'd love to hear from you whether you were able to attend or not.

"S'more" favors that you will love and a free download to get you started!

Thursday 1 March 2012

If you have been to the new Creative Studio space in the Toronto store, chances are that  you have already seen my "s'more" favor packaging ideas. I saw a similar idea with a square box on Pinterest a while ago and as soon as I saw the clear take out boxes I knew that I had to create my own version of this idea.

I stacked graham crackers, chocolate and large marshmellows in small clear take out boxes and used our new options labels, clean edge cards and assorted ribbons to decorate the containers.

I could see these favors being used at an outdoor wedding, a birthday party or beach get together at the cottage ... so it was hard for me to just create one version of this sweet treat.


Note: update February 2014 ... we no longer carry REX7 Options labels that these were created to print on. You can print these on our Sticker You blank sticker sheets . Cut out with circle paper punch or by hand with scissors.


I've also included a download for the art without the circles so you can create whatever shape of label you would like. You can download the art here. 

To decorate the first S'more favor I simply wrapped a red ribbon around the box, secured it in place with some two sided tape and then added my circle label to the front of the box.


When I was decorating this next favor I was inspired by our burlap ribbons and I thought that this favor would be perfect for an outdoor wedding or party ... can't you just see these at a reception in a barn!  I tied a variety of different coloured ribbons, twine and burlap together on the wire handle along with a gift tag.


This last S'more favor box was designed with a totally different kind of party in mind ... I was thinking about a summer birthday party at the cottage with the kids. I combined a custom label with some some funky scrapbooking papers here. I tied the papers to the wire handles using two pieces of ribbon. I have girls so I usually make things a little more "girly" when I am thinking about birthday parties but this could so easily be interpreted for a boy's party if you used a different scrapbook paper and ribbon.