glass jars + daisy lids + paper straws = party to remember

Tuesday 29 May 2012


I was thrilled to see all of the new jars and metal daisy lids that arrived in the stores (and online) a little while ago. These little glass containers are perfect for parties and weddings! Add your favourite drink, a daisy lid, a paper straw and perhaps a few "embellishments" and I'm sure that your guests will be talking about these all night. The best part is that they are so simple to make and you can personalize them to match your theme.

Here's a few ways that I decorated these jars with the daisy lids ...
If you have been following this blog, you will already know that I love baker's twine and try to find a way to work it into many of my projects. Here I used red and white baker's twine to hold a mini paper tag that I punched with a decorative paper punch. I added a red and white striped paper straw to co-ordinate with the baker's twine.
Note: We sell these tags and paper punches in the Creative Studio area at the Toronto store only.
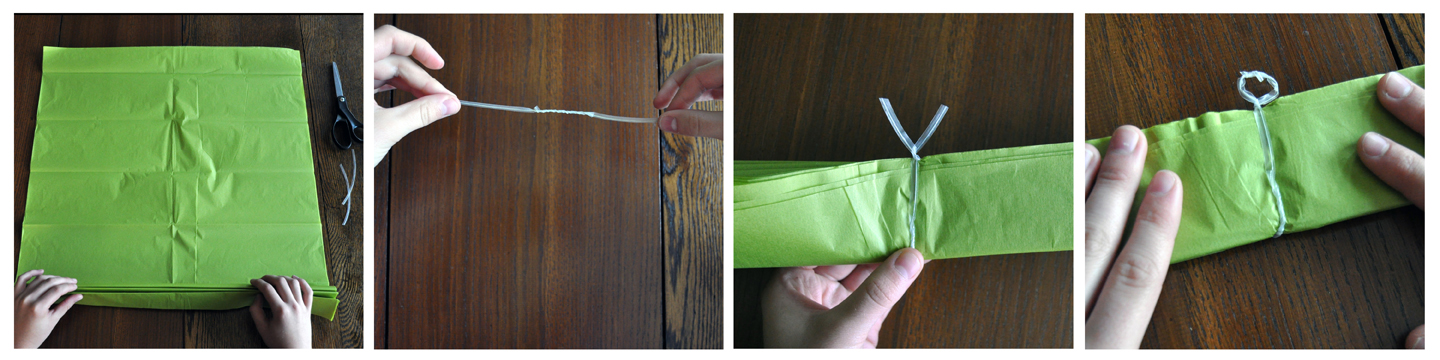
This next jar was decorated with a paper flower that I tied onto the jar with a green satin ribbon. I made these same paper flowers to decorate a wedding favor and wedding money card box earlier this year and I thought that this would be a sweet addition to that wedding's decor. You can see my paper flower making tutorials here and here.
And one more simple idea is to just attach glitter tape to your straws. I cut the ends of the tape to look like a little flag.
Note: we currently only sell the glitter tapes in the Creative Studio at the Toronto store.
If you are looking for more ideas with these jars, here are some of my favourites that I have pinned to my boards on Pinterest ....
and here are the links to the pictures one, two, three, four, five, six, seven!

And if you are looking for some fun drink recipes for the summer to serve in these beautiful containers, here's three that I have pinned and looking forward to trying this weekend at the cottage: 1. watermelon & strawberry lemonade, 2. raspberry lemonade and 3. frozen strawberry mojito (will make this one after the kids have gone to bed).

If you missed my last blog entry ... I have a giveaway going on that is open until May 31st. If you leave a comment on this post you will be included in the draw ... leave a comment on both posts for two entries!! Good luck.


tissue paper flower pom-pom tutorial and a give away

Friday 25 May 2012


Wasn't that a party last night? We had another Creative Event in the Toronto store last night and from the feedback and emails that I have received, I think that everyone had a good time! I was so proud to see everyone to go home with their completed projects - a fun resin flower ring and a beautiful tissue paper flower pom-pom. 

As promised, here is a little tutorial that I created for making the tissue paper flower pom-poms. We are planning to make kits that you can buy complete with 8 sheets of coloured tissue paper, twist ties and instructions. They will be in the stores soon - I'll let you know when they land!


To start you will need tissue paper in solid colours of your choice, twist ties or floral wire, scissors and monofilament or ribbon (to hang).
To create a large flower pom-pom use 8 sheets of 20"x 30" tissue paper.
To create a medium size flower pom-pom use 8 sheets of 15"x 20" tissue paper (cut the 20"x 30" sheets in half).

Step 1. Stack eight sheets of tissue paper together. On the shortest side, start making accordian folds about 1 1/2" for the large pom-pom and just a little more than 1" for the medium pom-pom. You want to crease each fold as you go. When all of the tissue has been accordian folded, fold the tissue in half and crease again.

Step 2. If you are using twist ties you will need to join two together to make one long twist tie.

Step 3. Fold the twist tie in half and slip it over the centre of the folded tissue. Twist (as shown above).

Step 4. Now take the two ends of the twist tie and twist again to form a loop. This loop will come in handy later when it is time to hang the pom-poms.
Step 5. Using scissors, trim the ends of the tissue into rounded or pointy shapes. You may want to cut a few layers at a time because the tissue is quite thick. Don't worry if the ends don't look perfect ... once you open the layers it will look great.
 Step 6. Separate the layers gently by pulling away from the centre one layer at a time. You don't want to tear the tissue so take your time doing this.

Step 7. After separating one half of one side, do the same on the other half of the first side.

Step 8. Flip the pom-pom over and repeat steps 6 & 7 on the other side.

Step 9. And now you are ready to hang! Use monofilament (fancy name for fishing line) or ribbon and attach to the twist tie loop that we created.

Here's a couple of tips if you are making a lot of these for a wedding, party or special event.

(a) Make all of your tissue paper flower pom-poms ahead of time but only until Step 5. Plan extra time to complete the majority of the pom-poms where you are having the party. The pom-poms are quite large and difficult to transport. They also get damaged easily if they are piled on top of each other or stored in boxes. I'd suggest making a few of them before the event so you know how to make them and that way you will have a couple of examples to show whoever is helping you to complete the final steps.

(b) I like to mix the large and medium sized flower pom-poms together with paper lanterns. Whether you are making everything in one colour, two colours or lots of colours, the varying sizes look great together.


Here's some great examples of these tissue paper flower pom-poms that I have pinned to my pinterest boards.

Would you like to make one of these tissue paper pom-poms yourself? I have a few extra kits left over from the Creative Event last night and I'm going to make up a couple of loots bags as a giveaway on the blog. To enter the giveaway, just become a follower on the blog and leave me a comment on this post for a chance to win. I'll pick the winning names on May 31, 2012!


Lauren and Adam's wedding { project} no. 2

Thursday 24 May 2012

Lauren and Adam's wedding is just a little over a month away and I'm going to share with you another project that I have created for them ... their money/gift card holder. Lauren had a difficult time deciding which card holder she wanted for her vintage themed wedding. She really liked the birdcage card holder by Weddingstar but was not loving the colour and thought that it was too dark. But I knew that we could make it work for her wedding if we spray painted it in a colour that would co-ordinate with her wedding decor and she agreed to try it out.

I personally love this Weddingstar birdcage card holder because I would use it after the wedding as part of my home decor. Here's a few ideas that I have pinned ...
For my home, I would stack a few vintage books, a small framed picture and a cast iron bird inside the birdcage to create a little vignette.


Lauren had already selected the antique white french provencal tin containers (see above) for her wedding favors and I knew that it would be easy to find a spray paint in a similar colour at the local hardware or paint store.
Here's some of my tips for doing this project:

1. Give yourself at least a week to do this project ... this is NOT a day or two before the wedding kind of project!!
2.Take your time and do a little bit everyday (especially if it is humid) so that you can layer multiple fine coats of paint ... do not over spray or you will see drip marks.
3. Work in an area that will allow you to leave the birdcage to dry for a length of time.
4. We used a spray paint designed for metal - matte or glossy finish is up to you.
5. I took a large box from the grocery store and cut it up to make an area to spray inside ... this kept the paint from spraying all over my work area and made clean up easy.

To keep with the vintage theme, I shredded old book pages for the bottom of the birdcage. Lauren and Adam will be displaying the birdcage on a small round table with a table cloth near their sweetheart table at the reception. The "xoxo" canvas banner that I created here will be attached to this table.


resin flowers + {free} download = cute shower invitations

Tuesday 15 May 2012

Our resin flower cabochons have arrived in all stores and I have been busy creating projects using these beautiful little flowers. We have three different styles of resin flowers and there are lots of colour options. If you are planning a wedding or party, you can use these beautiful little decorative elements to decorate stationery & favor boxes.

I created the shower invitations above so that I could add a small resin flower to the design.


You can download my art for the shower invitation here.
Please note that this art is for personal use only.

Here's a quickie tutorial to show you how I made the invitation ...

1. Download the art and print it out on cardstock. I used a kraft coloured cardstock for mine but you could also use white or off white for a different look.
2. I cut my invitations with a paper cutter. Use the crop marks on the art as a guide. I started by cutting the two invitations apart. Your finished invitations will be 5" x 7". 
Note: if you don't have a paper cutter you can use a ruler to draw cutting lines and cut with scissors. I find that paper cutters save time and give professional looking results.
3. I added round corners to my invitations to make them look a little more special.  My corner cutter of choice is the "Crop-A-Dile Corner Chomper by We R Memory Keepers" and we have some in the Creative Studio at the Toronto store. I love this tool because you can cut multiple layers of paper at once and it will cut through thicker materials like cardboard, leather and metal. You can watch the how to video for this tool here .
4. The last step is to adhere a resin flower to the invitation as shown above. You can attached the resin flower using gel medium, glue dots or two-sided tape.

If you are going to mail these invitations you will have to pay extra postage. Because you saved so much money making these elegant little invitations yourself the extra postage will be worth it!


I will be showing my resin flower projects at the Creative Event in our Toronto store next Thursday (May 24th, 2012). Everyone will have an opportunity to make a resin flower ring and a tissue paper flower pom-pom. Registration is free but space is limited. You can read more about the evening and how to register here.


Creative Evening with Lorrie Everitt in the Toronto Store

Thursday 10 May 2012

Registration is now open for my Creative Evening workshops and demos in the Toronto store on Thursday May 24th, 2012. 

Be inspired:
1. learn how to make tissue paper flower pom-poms
2. see how to use our new resin flowers on packaging, stationery and jewellery
3. as I share my secrets for making iron on transfers "pop" and "shine"

I'm setting up stations this time so everyone will have a chance to make a tissue paper flower pom-pom and a resin flower ring.

RSVP by email to lorrieeveritt@creativebag.com or call 1-800-263-1418 by May 21st.
There is no fee to register but registration is again going to be limited so sign up early!

Enjoy private shopping after the class and receive 10% off your entire purchase as a special bonus.

Please note that the store closes at 5:30. We will re-open the doors at 6:00 for everyone who has registered for the event. There is a good chance we will have a waiting list again so if you have to cancel please let us know asap.

Hope to see you there!!

let's party with paper straw garlands

Tuesday 8 May 2012

In my last post I showed you lots of party ideas using Make + Print stickers, bottles and lots of other great products that we have in the stores and online right now. I made some paper straw garlands for the party and in this post I'm going to show you how I made them.

I made two different paper straw garlands.

The first one, you can see it at the top of the picture, was very simple with paper straws cut into 1" lengths, large glass beads and foam shapes all strung together on baker's twine

Please note that you can use whatever type of beads that you want ... glass, plastic, foam, felt ... just make sure that the colours of the beads work with the colours of your straws. 

The second garland, bottom of the picture, was a little more involved because I added small clothepins to the garland so that I could hang pictures or letters (to spell out words). I could have left the clothespin plain but of course I had to decorated mine. I used premade fabric flowers that we are currently selling in the Toronto store (in the Creative Studio area).

As soon as I finished making the second garland with the clothespins I realized that this party decoration would make a great craft project for the kids tp make at the party. The garlands the children made could be used as a decoration in their bedrooms to hang art work or school awards/certificates. 

I packaged the paper straw garland craft kits in clear little take out boxes. You can see that I added another one of the stickers that I designed and printed using the Make + Print stickers, a tag and some ribbon to decorate the take out box.

Here's what I put into the craft kit ... baker's twine with a large (blunt) needle already threaded (so that the kids don't have to ask you), assorted beads (you can see that I used clear plastic beads for this kit), paper straws precut into 1" lengths, small wood clothespins and paper or fabric flowers (you don't have to decorate the clothespins so the flowers are optional). The only other supplies that you will need is some glue if you are adding flowers to the clothespins (white glue is fine) and a pair of scissors to cut the baker's twine at the end if it is too long.
The instructions for these are very simple.
1. Glue the flower to the clothespin as shown and let dry.
2. Tie a loop and knot at the end of the baker's twine. You will need an extra large knot so that the first bead you add to the twine does not fall off.
3. Then start stringing together the beads, paper straws and clothespins. Make sure that you string each of the clothepins the same way on the baker's twine so that they all face the same way when you are done.
4. When you get to the end, make another loop for hanging and tie an extra large knot next to the last bead so that it does not fall off.
Hint: I created a pattern so that every colour and element was spaced out along the garland. 

If you decide to make these as a craft project at the party with the kids make sure that you make one before the party. That way you will know what you are doing and the kids will have a sample to look at.
Have a great week!

let's party with stickers, bottles and few of my other favourite things ...

Monday 7 May 2012

I stumbled upon this quote on the weekend as I was relaxing with a cup of tea and my new "Where Women Create" magazine by Stampington & Company. I love this quote. It's such a simple saying ... just six words ... and it is exactly what I have been trying achieve with this blog. Each week, as I create, photograph and write about different ideas and projects using our products, I hope that I inspire you to get creative ... and hopefully, you will create something wonderful and inspire someone else!!

Today I am going to share with you some of the projects that I created for a birthday party. I made all of the sample projects using our new Make and Print Stickers. If you are in the Toronto store, you can see these projects on display in the Creative Studio section.
Sweet tables and food bars are so popular right now  ... so of course our birthday party has to have one! I used Make and Print Stickers to create labels for our glass containers and twist top bottles. One of the labels was used to create a "sign" that I stuck into a glass container full of candy coated chocolates. Everything on the table should have a label or sign ... try to use your imagination and tie the words into your party theme.

I created the art for my labels in Photoshop and printed them on blank 8.5" by 11" sticker sheets on my inkjet printer. If you do not have computer software or the computer skills to make your own art don't worry because the Make and Print Stickers have an instruction sheet  that will help you to go online and create your stickers. Inside each package you will find a secret code that is unique to your stickers. Use the code on the Sticker You website and you will find creating your own stickers a fun and easy process. The website has lots of designs for you to use and personalize at no additional cost. They even have licenced art from well known brands like Batman, Dora the Explorer and the Archies just to name a few.

I added paper butterflies to the labels to give them a little something extra. I cut the butterflies out of two-sided scrapbook papers using a couple of different butterfly paper punches. To give the butterflies some dimension, I folded the butterflies in half. I also tied pretty dotted ribbon and baker's twine to the containers.
You can create your own party drinks using our twist top and swing top glass bottles . I used water and drink crystals in colours to match the party decor.

The little flags on the mini cupcakes were made using our lollipop sticks and patterned tape.

The cupcakes are displayed on wood serving trays. I know that the wood serving trays are disposable but don't throw them out - I've got lots of great ways to use these after the party! (More about that on another post!!) 

Our paper straws come in so many great colours that I could not pick just one colour so I used three. I knew that I would not need all of the straws for the party so I used some of the extra straws to create some unique party decorations ... straw garlands!
 These straw garlands are so easy to make. I would suggest making them with the kids at the party for something to do. I will give you directions for the making the straw garland in my next post.

I used clear containers and Make and Print stickers to create the favors shown above. You can see that I added paper butterflies and ribbons on the favors so that they would co-ordinate with the other party decorations.
And the last project that I I wanted to show you was really the first project that I made for the party ... the party invitations. You can see that I used a bitty bag, a library pocket, a mailing tag and a sticker with the birthday girl's picture to create the invitation. Assorted ribbons were tied onto the mailing tag so that it would not be missed. Information about the party was printed on a larger piece of cardstock and tucked inside the bitty bag.

Hey, do you like my paper flower pom-poms? I made them using tissue paper and twist ties. I hung the paper flower pom-poms and some paper lanterns together as a large group using clear string but I could have used ribbon if I wanted another decorative element.

I'm going to be making these tissue paper flower pom-poms at the Toronto store on Thursday May 24th at 6:00pm. Save the date on your calendar if you are interested in joining me. I'll give you more details about other projects I will be doing that evening and how to register for the event soon.

Lauren and Adam's wedding {project} no. 1

Thursday 3 May 2012

Last week I told you that I was working on some projects for Lauren and Adams wedding and I'm excited to share with you the first project that we worked on for the reception.
Lauren wanted to have a sweetheart table instead of a head table and to decorate the table we decided to create a canvas banner with their initials.
The sweetheart table will be round and we are going to set up two more round tables on either side of the sweetheart table with similar canvas banners. One table will be for the wedding cake {sweet} and the other table will be for the gift card holder {xoxo}.
 I've been pinning pictures of sweetheart tables on my Pinterest boards in case you are getting married and looking for sweetheart tables inspiration as well.


Above are a couple of my favourite pictures of sweetheart tables that I have pinned.


Sweetheart tables allow you and your partner to spend some time together and allow your wedding party to sit with family and friends. Just like a head table, you will want to add some extra special elements to your sweetheart table to make it stand out from the rest.


Here's a quick tutorial for how I created the canvas banners for Lauren and Adam ...

1. You'll need iron on transfers, lace ribbon and canvas banners (we sell both of these at the Toronto store), and jute rope.
2. I created the letters for the banner on my computer and printed them on a sheet of transfer paper on my inkjet printer. The font that I used is called Antique Shop. It is not a free font but here's the link if you are interested. I've shown you how to use the iron on transfers on a previous posts here or you can refer to the instruction sheet included in the iron on package. Make sure that your letters print out in REVERSE.
3. You will need to cut out each letter before you can iron the letters onto the canvas. Make sure that you leave a white space around each letter. I wanted to position the letters on the banners so that I would have lots of space at the top to add a thick row of lace ribbon. To help me position the letters, I used natural light and a window to see each letter through the transfer paper. Iron each letter as per my previous post.
4. Peel the paper back off the transfer once the paper has cooled down a bit.
5. To attach the lace ribbon to the top of each banner you can either sew it on by machine, sew it on by hand, glue it on with fabric glue or use a two-sided fabric tape. I think that the two-sided fabric tape will be the best way to go if you don't like to sew and we will have two-side fabric tape in the Toronto store in a week or two.
6. Once all of the banners have the lace ribbon attached you are ready to 7. tie the banners together with jute rope. You will want to add extra long pieces of jute rope to each end so that when it comes time to hang these up you will have lots of rope available.

Here's a close up of Lauren and Adam's banner for their sweetheart table.

In my previous post, I gave you an iron on transfer design to decorate a canvas bag. On the side of the iron on are the letters to spell LOVE. Use those letters to create this banner ...


I think that this would be cute for engagement or wedding photos ... you can see similar banners in use in photos I've pinned to this Pinterest board.

I can see this "love" banner at a baby shower and then again at baby's first birthday party.

I'm going to show you how to make the letters on these banners pop and sparkle using glossy accents and glitter later this month ... so stay tuned for more!